
Preface:
Because before, in various waysWebsiteSearching aboveNotebookMemory overclockingTutorialAfter watching dozens of videos and articles, I found that there are basically no systematic, relatively complete tutorial videos, and on Xianyu, there are some merchants who charge money but don't do anything. Therefore, I decided to create a complete system and tutorial on laptop memory overclocking myself. After several days of preparation, it was finally done, covering all aspects of laptop memory overclocking.
Through this tutorial, I hope to help those who need performance for their laptops or feel unsure about where to start with memory overclocking.
Note: This tutorial is most suitable for the Legion R9000P 2023. For laptops with Intel CPUs or other AMD laptops/desktops, I will explain the purpose of each parameter in detail later. You can refer to overclockingApproach Not suitable for copying operations
1. Memory overclocking pairGamesImprovement
If you play online games like PUBG, Naraka: Bladepoint, Justice Online, DNF, etc., increasing your memory is definitely a mustCost performanceThe highest choice, a high-frequency, low-latency memory, can greatly improve online gaming.
2. Memory differences and recommendations
The R9000P comes with three different memory chips: Hynix, Samsung, and Micron
You can check your own memory chipsDownloadPicturesToolsBox, I'll share the download link at the end of the article.
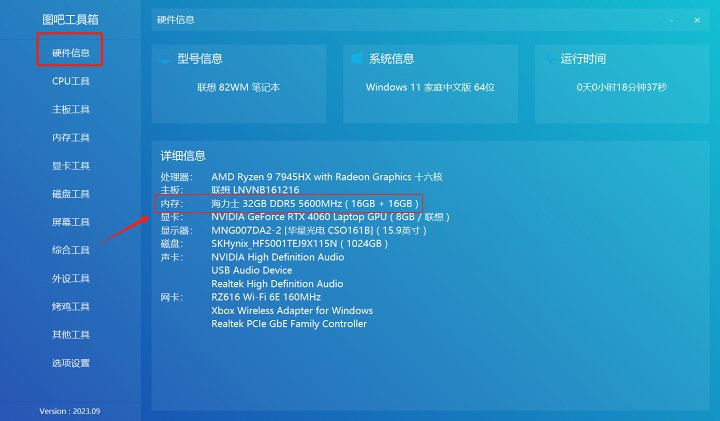
Open the Tuba toolbox and see hardware details at the top
You can then check your own memory chips
In terms of memory overclocking performance,
Hynix > three stars = Micron
16G>32G=8G
Regarding memory capacity, since the D5 is designed to have 16GB of RAM, 8GB of RAM is inherently low-spec, while 32GB of RAM is not recommended for gamers due to price and overclocking performance
If you're sensitive to game frame rates or need high frame rate for esports players, I recommend buying 16GB x 2GB of memory from a reputable store
3. Preparations before overclocking laptop memory
• Before officially starting, prepare your laptop disassembly tools (screwdriver, blade clip). Overclocking the laptop's memory involves three states: boot, off, and stable use, debugging until you find the parameters that suit you best. Not booting is basically inevitable
• Files to download (links will be provided after the article)
1. Tuba Toolbox
Memory model query, stability testing, and performance testing toolsView the link
2. UMAF(UniversalAMDFormBrowser)
It can unlock hidden options for the branded BIOS of AMD models
Link:View the link
Extraction code: dpgv
4. Steps for overclocking laptop memory
• System settings
First, go to the desktopComputer— Right-click — Show more options — then select Manage
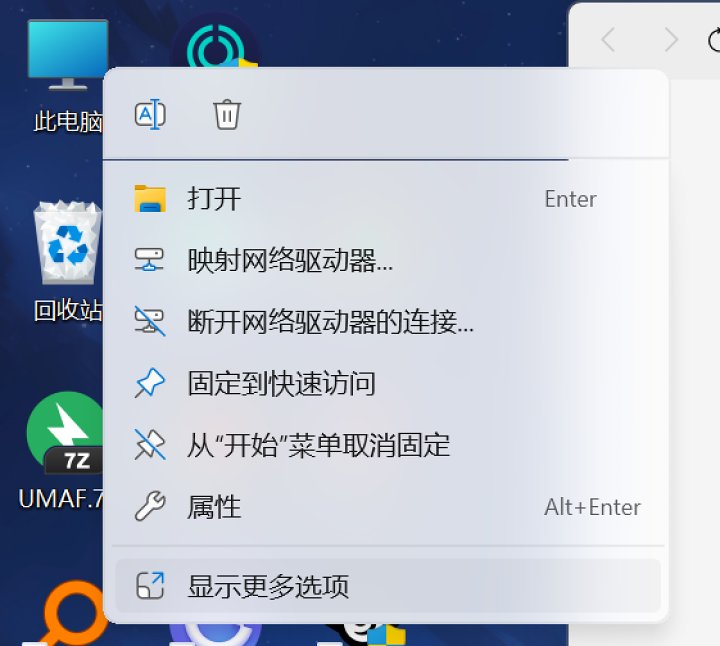
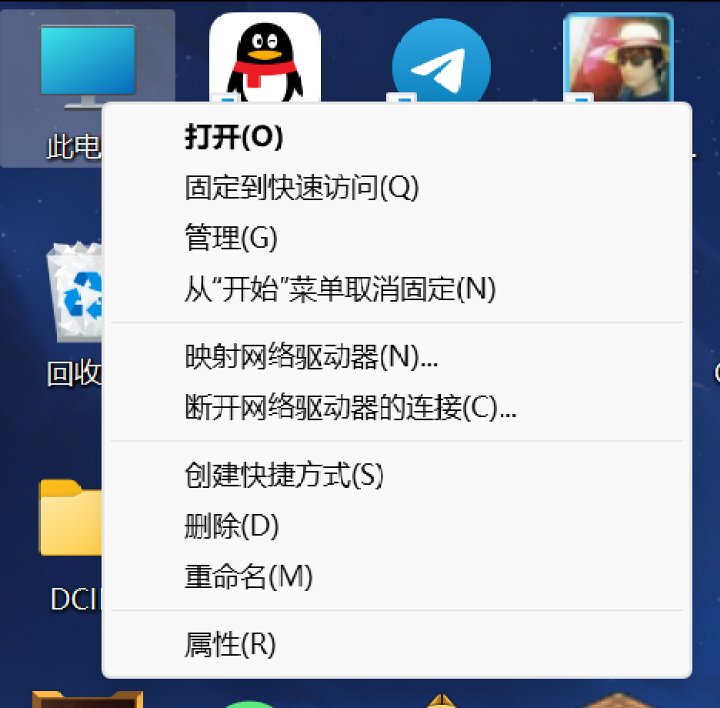
Go to Disk Management—then right-click any disk (preferably not the C drive) and select Shrink Volume
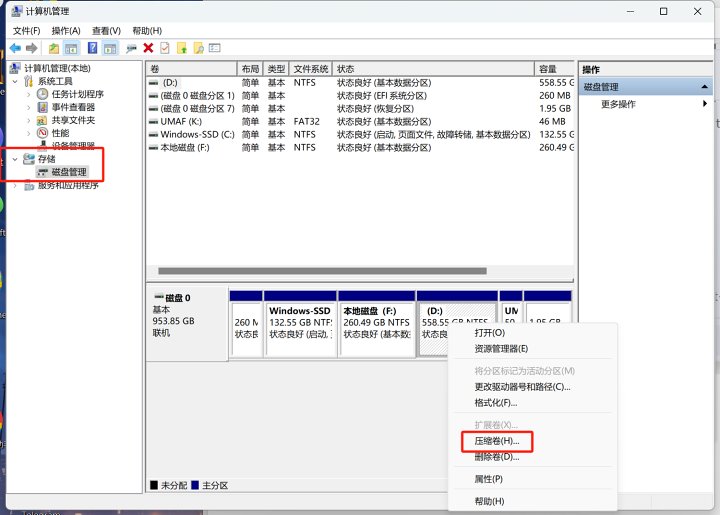
Enter 50 in the compressed space

After clicking Compress, you'll see an unallocated one. Right-click and select New Simple Volume
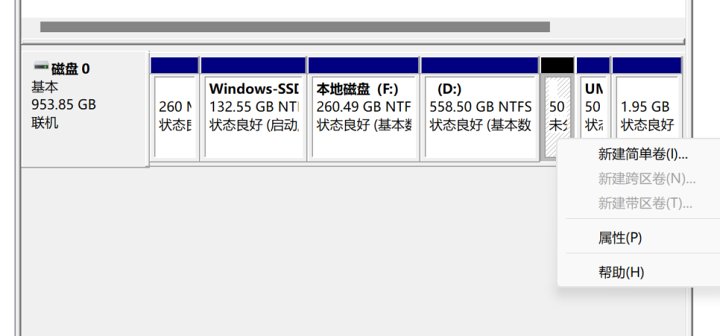
Go straight to the next page to this location and select FAT32 format

Then a new disk will appear on your computer. Extract the UMAF file onto the disk
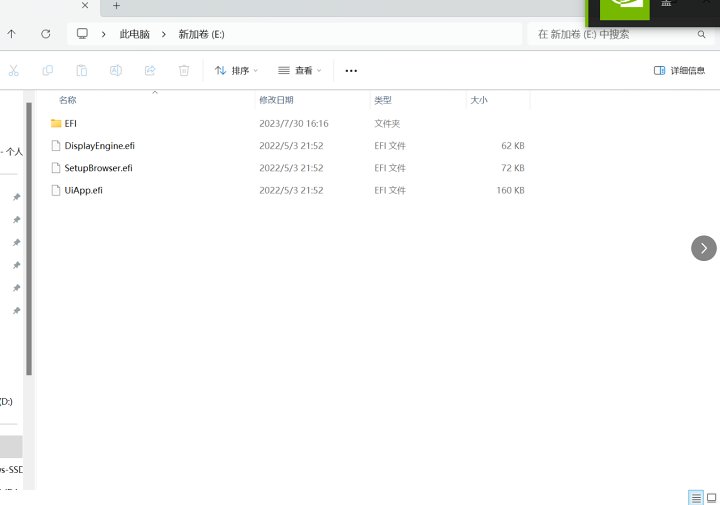
At this point, the computer setup is complete
• BIOS settings
First, restart the computer. When you power it on, press F2 to reach this screen. Click More

Change the language to Chinese in the options
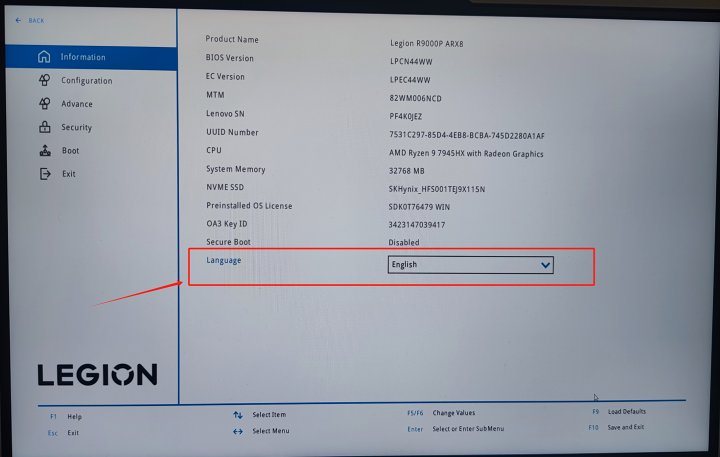
In Security Settings, scroll down and turn off Secure Boot
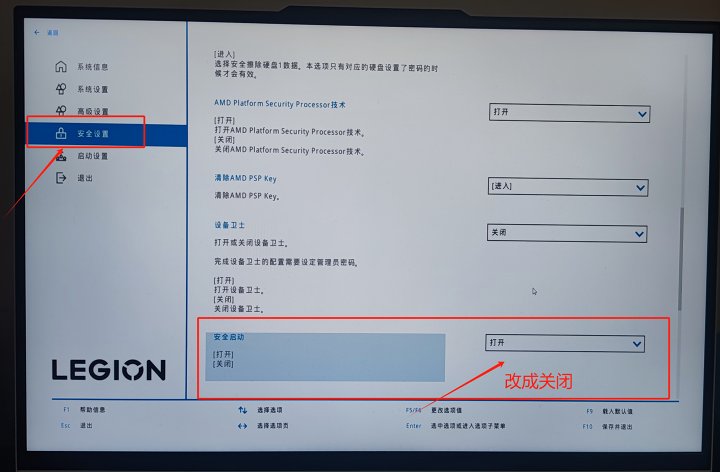
Press F10 to save and restart
• UMAF settings
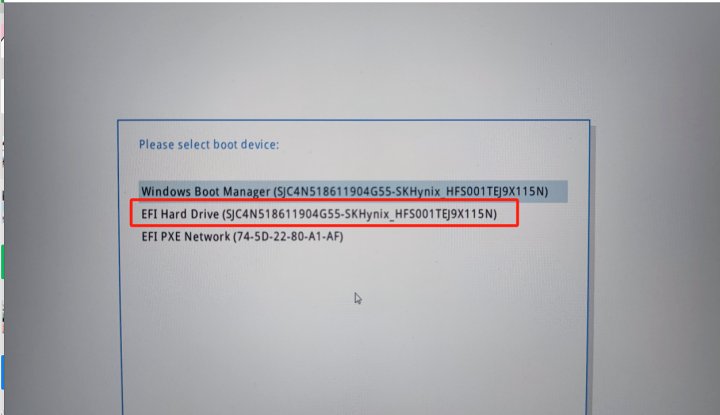
First, restart the computer. Press F12 when powering on, and you'll be prompted to select the startup option. If nothing unexpected happens, there should be three startup options
Choose this EFI Hard Drive
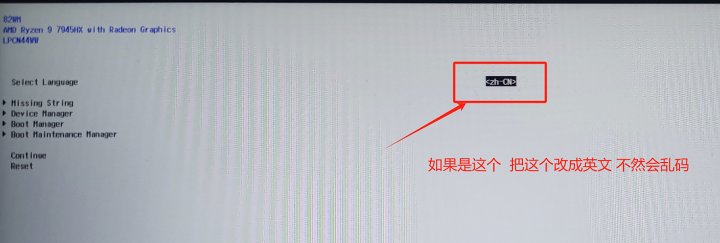
Go to this interface and check if it's in Chinese
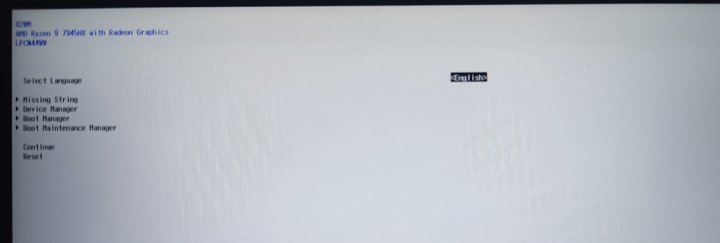
Correct style
Choose this one
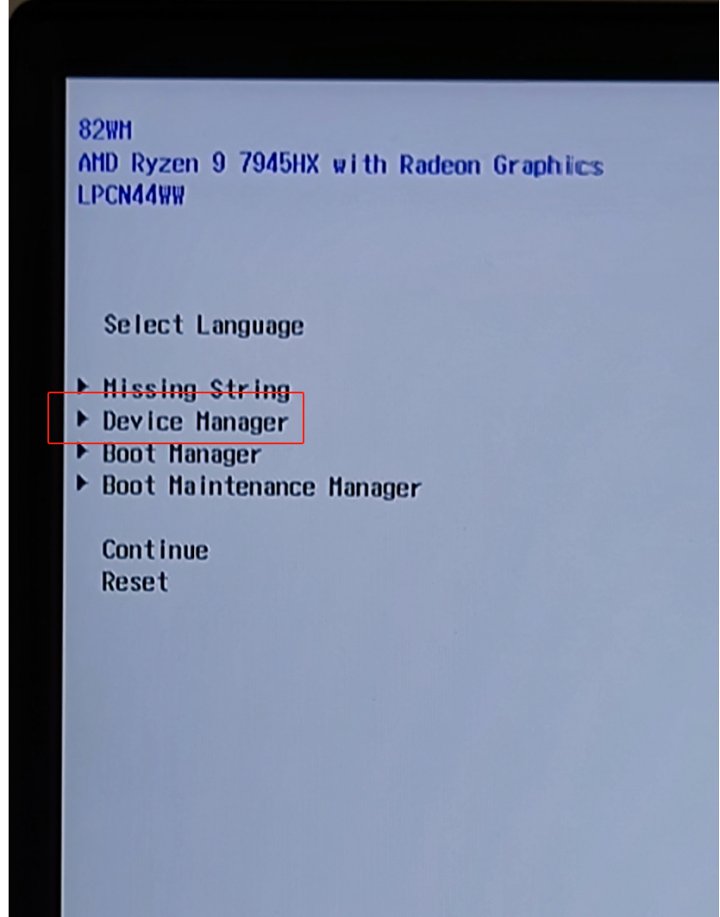
Moving on to the next step
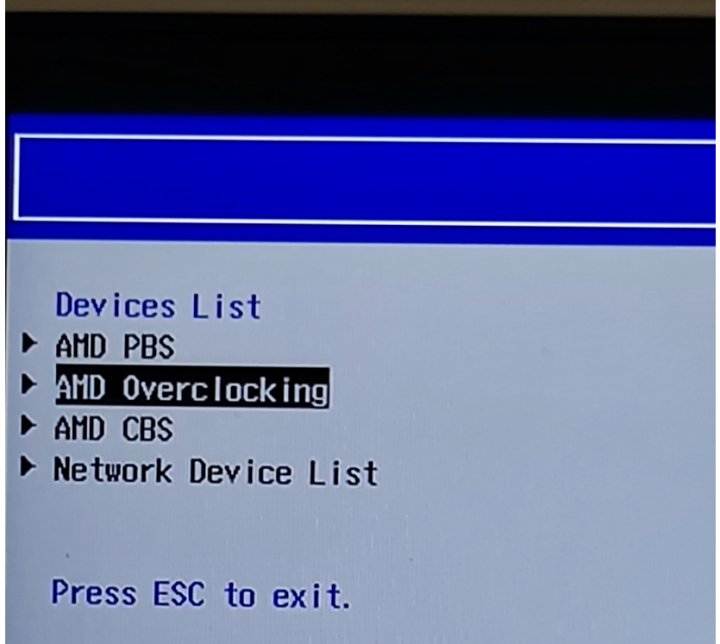
Moving on to the next step
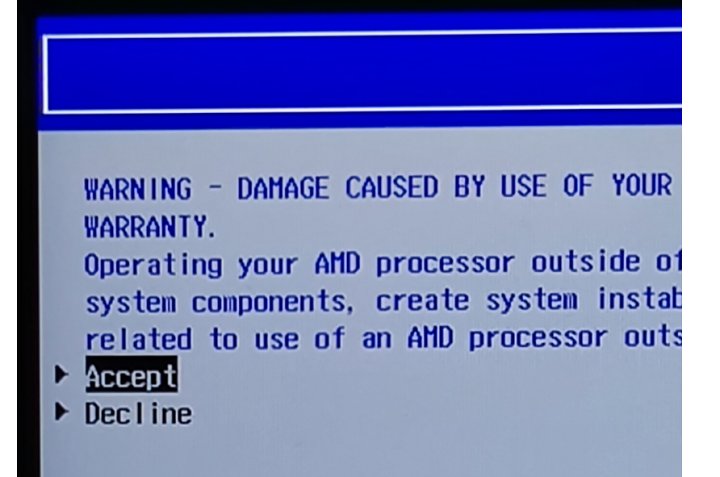
First, adjust the voltage (after testing, changing the voltage increases heat generation, so consider whether to modify it. If not, you can proceed directly to the next step).
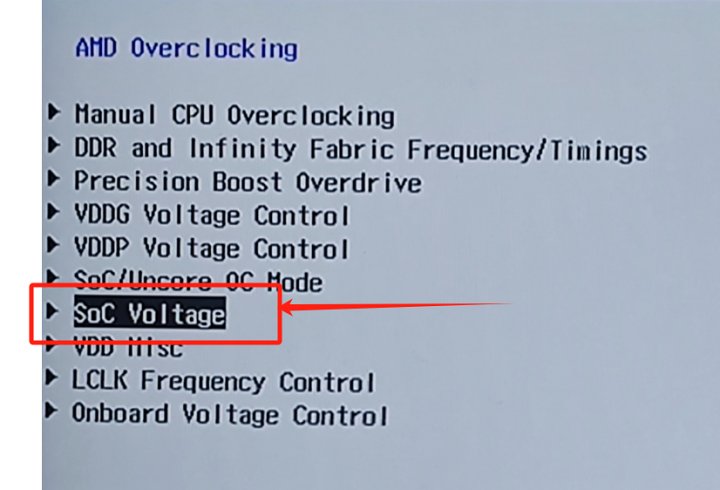
This place was changed to 1200
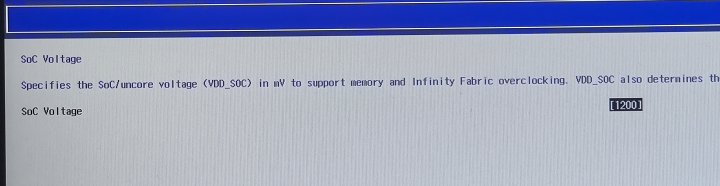
Then go back and select DDR
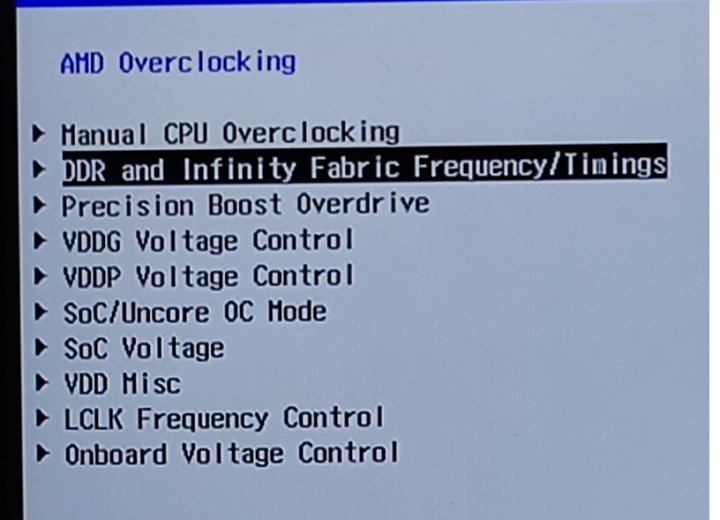
Choose this DDR prefix
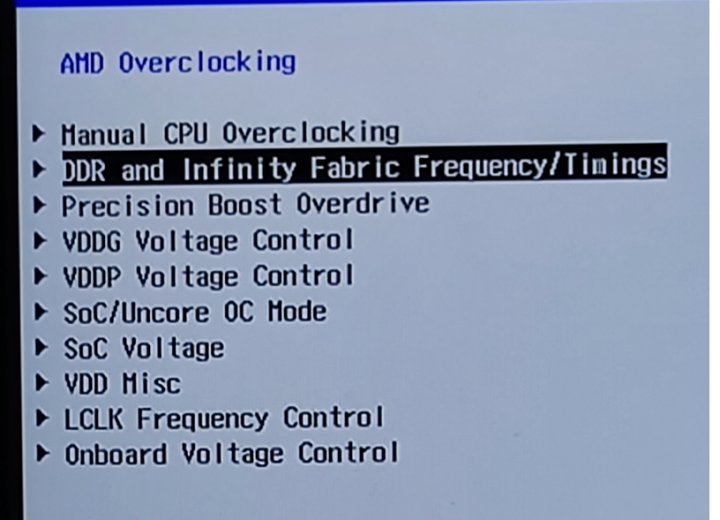
First, go to the second option: Modify Settings

Change the top to 2000 and the bottom to UCLK=MEMCLK to ensure no frequency division

Then go back and select the first one
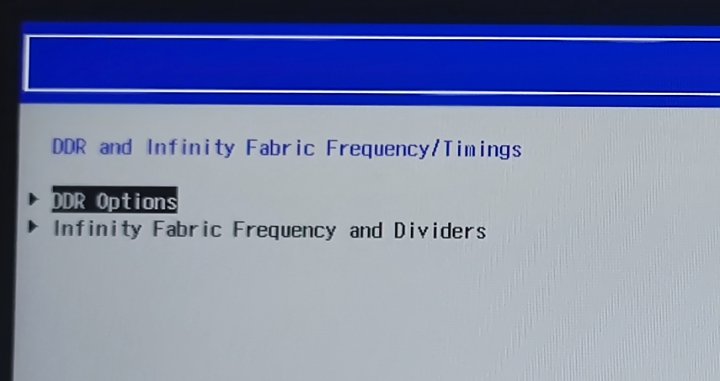
Continue with the first option
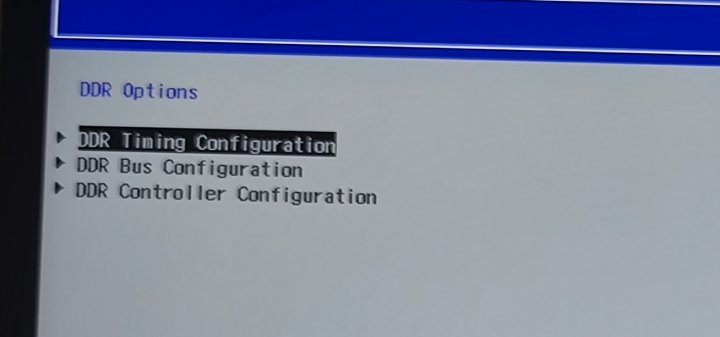
Change the first one from auto to Enabled
After making changes, these adjustable parameters will appear below
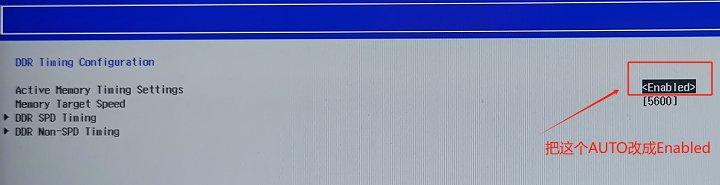
First, enter DDR SPD
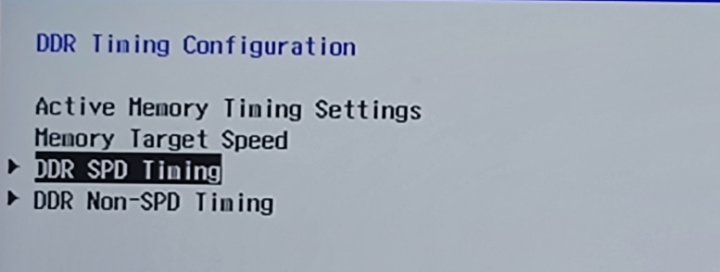
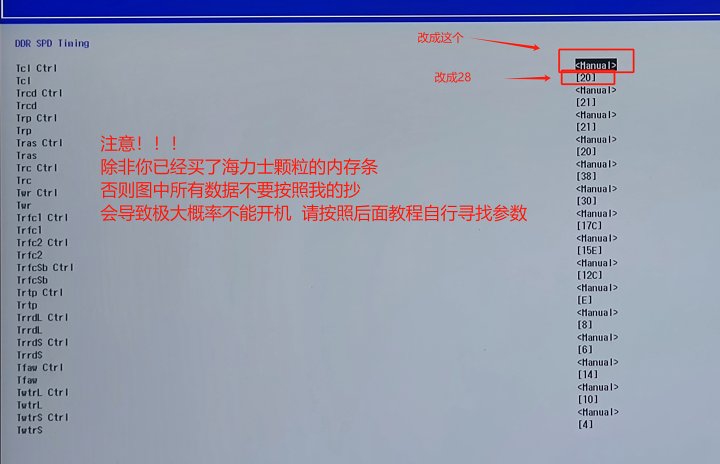
If it's your first time coming in, it should be all AUTO
Note!!
Because in BIOS, the timing is always in hexadecimal, so all the numbers you input must first be converted to hexadecimal before you can input them
It is recommended to search online for online hexadecimal converters for use
(To convert decimal to hexadecimal)
Ignore the other parameters. Check the first Tcl and Ctrl to change this from auto to manual
Then change the first Tcl to 28 (this is to ensure the first timing is 40).
Note!!
Unless you've already bought a 16GB memory module with SK Hynix chips
Otherwise, do not copy all the data in the chart as I am
This will likely cause the computer to fail to boot because memory conditions differ. Please follow the tutorial later to find the parameters yourself
Then return
The second line corresponds to memory frequency. Start at 5200, then only add memory frequency, add 200 at once, don't change anything else
Try 5200, 5400, 5600, 5800, 6000
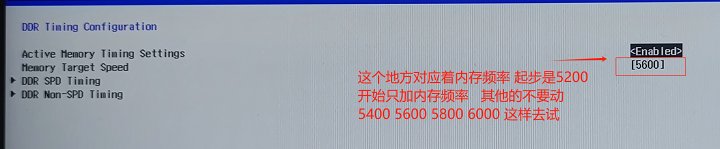
For example, first set a frequency of 5200, save, then return to the prompt, press Y

Continue back here and select Continue
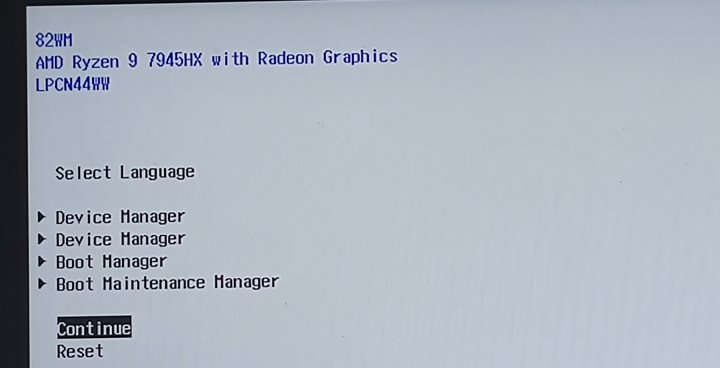
A second prompt will appear: press Enter
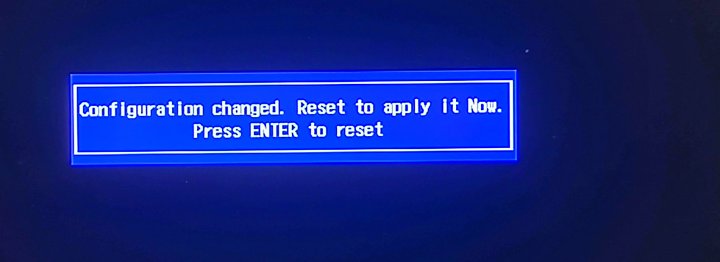
Save and then check if the computer can boot
Please monitor your computer's current state before proceeding to the next step
• If it can boot up, but you still want to pursue performance
First, check the memory stability test. After passing, check the "fine-tuning overclocking" test until you find the appropriate parameters
• If it can boot but the performance feels sufficient, and you want to use it stably, see the "Memory Stability Test" later
• If you can't turn on, watch "Save Your Savior"
4. Fine-tune overclocking (after changing memory / learning approach)
• In the fine-tuning and overclocking section, I will explain the setting methods for each parameter. Using my methods, you can find the parameters that suit you best
• Because the original memory performance is weak, there is basically no reserved performance at the factory, and there is not much overclocking space. You can learn this approach
• Because of the 7945hx memoryControllerIt's relatively poor, so I recommend standardizing the maximum frequency at 5600
• To make it easier to understand, I explain the parameters in decimal for the rest of the time. For Legion, convert to hexadecimal first before entering (if other models are unclear, check the BIOS yourself).
• Go to the DDR SPD Timing interface
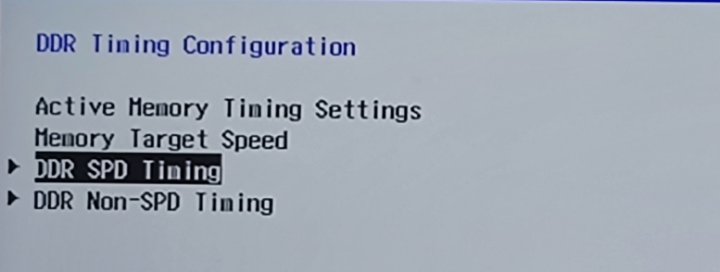
• I divide the timing into main and secondary parameters. Primary parameters have a big impact on memory. If you don't understand the parameters, just AUTO
• Note: The following parameters are all in decimal
• Starting parameters (set to automatic without specifying)
Now, you can start compressing memory timing
tCL 40 / tRCD 48 / tRP 48 / tRFC 700
• tCL minus 2 each time (main parameters)
• tRCD minus 2 each time (main parameters)
• tRP and tRCD are consistent (main parameters)
• tRAS is directly set to match tCL; if unstable, add 6 each time
• tRFC1 minus 20 each time (main parameter)
• tRFC2 automatically or casually adjusts to 350
• tRFCSB automatically or casually set 300
• Start testing these parameters one by one. After testing one, start the next. For example, if you test 34 and the computer won't boot, switch back to 36 and continue testing until it stabilizes and passes
• After adjusting the main timing, test the whole thing. If everything is fine, proceed to the secondary timing
• Copy all the following parameters (decimal). If you can't copy them steadily, check them one by one. Change them to automatic until you find unstable small parameters, then add 2-4 until they stabilize
• tRC 56
• tWR 48
• tRTP 14
• tRRDL 8
• tRRDS 6
• tFAW 16
• tWTRL 16
• tWTRS 4
• Return to the previous level and then enter DDR Non-SPD Timing (third timing)
• The parameters here have been tested; only two are adjusted, and all others are automatic
• tRDRDSCL 8
• tWRWRSCL 8
• Up to this point, all overclocking sections are finished. Next are memory stability tests and fixes for no-boot repairs
5. Memory stability testing
• Open Tuba Toolbox, find the Memory Tool, and run a few rounds with TM5 to see if there are any errors. If there are, don't worry about what the error is—just go back to the previous step immediately
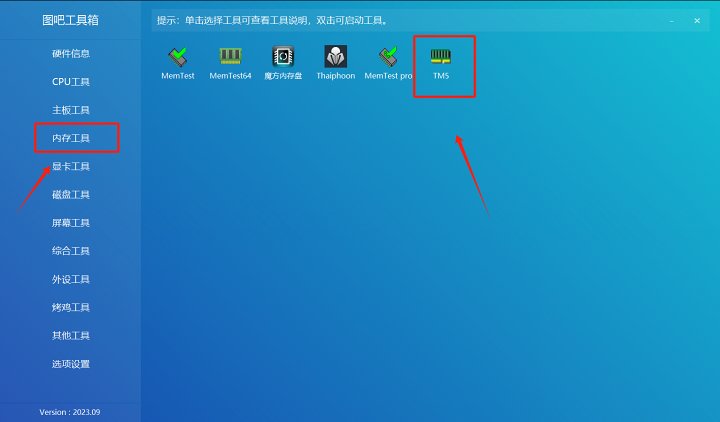
Check out TM5—after about three to five laps, if it doesn't get errors, you can try playing games

But note: software testing is always secondary; everything depends on actual stable usage
6. Save your savior
• If the computer remains black and does not light up when restarting, it is most likely due to overclocking values. At this point, we need to disassemble the computer to reset the BIOS
• Before disassembling, wash your hands or wear anti-static items on your hands to prevent static electricity from damaging the motherboard
• First, unscrew the ten screws on the back of the computer (remember to save)
• Then use a lifter to lift the back cover from the corner
• When fully lifting the back cover, use both hands to lift the edges of both sides and slowly swing the center buckle to complete the removal of the entire back cover
• After opening the back cover, it should look like this, then break it off firstBatteryRibbon cable (as shown)
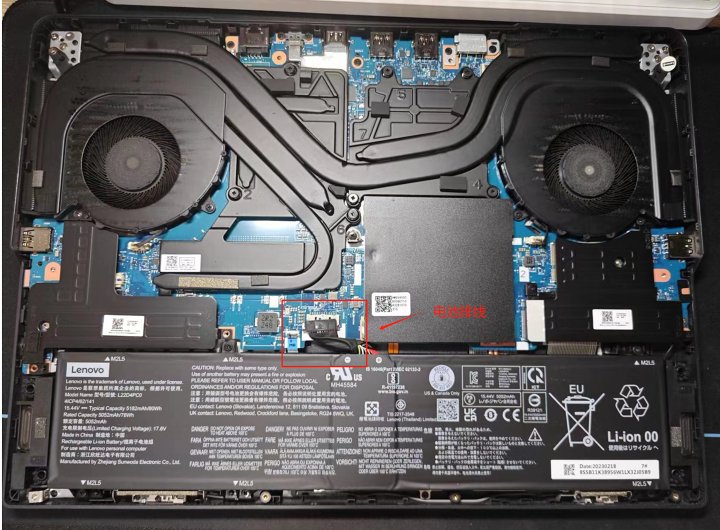
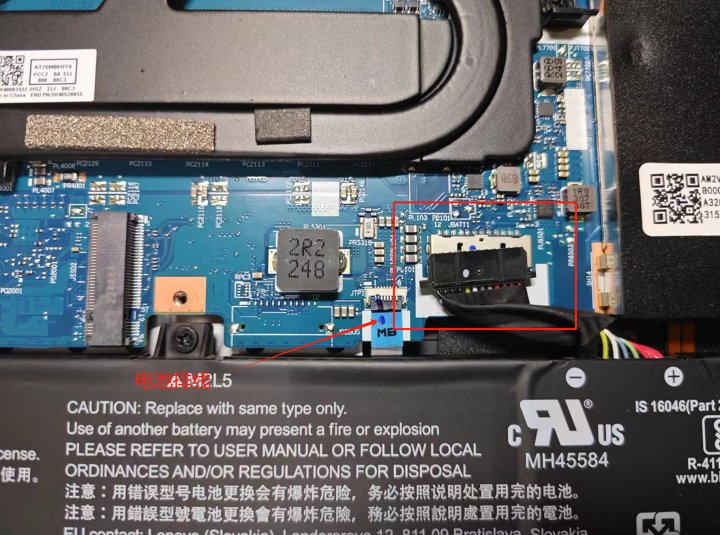
After disconnecting, press and hold the power button for 30 seconds to release the motherboard
Then remove the protective cover circled by the red frame. There are three screws in total (as shown). Be sure to check the screw positions carefully and don't remove them incorrectly
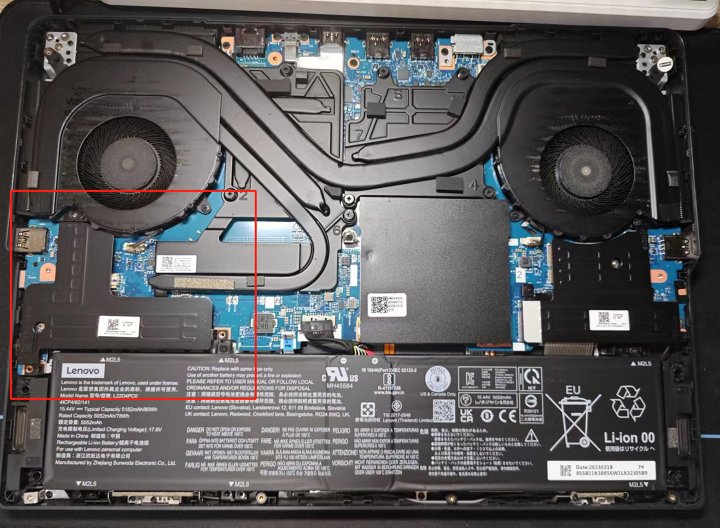

After removing it, you should be able to see the BIOS battery connection cable
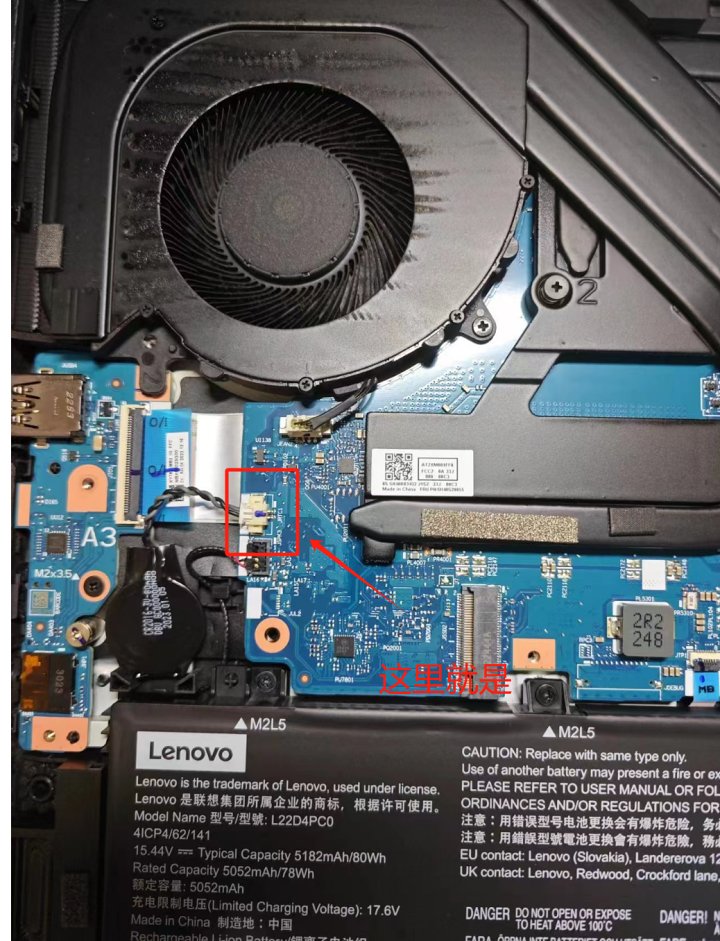
Remove the BIOS battery cable, then press the power button and discharge for 30 seconds. Once everything is reassembled, the BIOS will be emptied and the device will power on
It is permissible to refrain from it firstInstallationKeep overclocking the back cover until you find the parameters that suit you
This concludes the memory overclocking tutorial
The above tutorials are all based on my personal experience and some videos. If you have better suggestions or suggestions, feel free to message me privately for discussion.
I've been quite busy lately, and I'm sorry for taking everyone to the sidelines. After all, after becoming a regular worker, my time has indeed decreased. I'm very sorry.
If I get the chance, next time I plan to share some setup tutorials I've summarized myself. Combining it with memory overclocking should yield good results.
Original link:https://www.coolapk.com/…
![[Open Source Reading] January 2024 ≈ 400 carefully edited book source compilation and update - Baiyun Blog](https://www.bybk.cc/wp-content/uploads/img/af867764c3780f0b7da88376fca7bf92.png)
![[Open Source Reading] November 950+ carefully proofread book source compilation and update - Baiyun Blog](https://www.bybk.cc/wp-content/uploads/2023/02/Screenshot_20230222-1001582.png)
![[Open Source Reading] October 1300 Book Source Update - Baiyun Blog](https://www.bybk.cc/wp-content/uploads/img/1eeb6ae31cde88ab39faa2f19651638d.jpeg)
![[VMOS PRO 2.9.6 Member Edition] - Baiyun Blog](https://www.bybk.cc/wp-content/uploads/img/c303a7a50d3ebfa235cc380190db2980.png)
![[Open Source Reading] November 950+ carefully proofread book source compilation and update - Baiyun Blog](https://www.bybk.cc/wp-content/uploads/2023/02/Screenshot_20230222-1001582-1024x593.png)




No comments yet