
The first time I wrote about itTutorial, maybe the content wasn't written well, orOptimizationUncontrollable differences such as poor content and unmet expected results,LaterIt will gradually improve. Thank you for your understanding. If you have any questions or comments, feel free to discuss them in the comment section
This tutorial is about non-root That is AndroidDebugging bridges and XiaomiThe Surge system Optimization tutorial
————————————— Friendly reminder: ——————————————
This tutorial, except for the streamlined list, is suitable for all Xiaomi Surge systems and is recommended for the rest ofMobile phones Restore factory settings Or use it after upgrading to a new phone to achieve the best results. By the way, a word of advice: Xiaomi mobile data is not recommended for phone replacement, as it may cause bugs
———————————— Overview of Rootless Optimization ————————————
1. Android running on the Surge systemWireless debugging
2. Systematic rectification
1. Remove negative system optimization
(1) Streamline system software
(2) One-click to disable Xiaomi system ads
2. Perform positive system optimization
3. Software Rectification
1. DownloadInstallation Software with a good user experience
2. Optimization between software and system
(1) dex2OTA optimization
(2) Global high refresh rate
(3) Shutdown auto-start
(4) Setup ApplicationIntelligent and energy-saving
————————————— Preparation before the tutorial: ————————————
Items needed for this tutorial:
1. A Google account, already installedGoogle Store(External websites may be required), secondly HuaweiApp stores (preferably both), with at least one of the available stores for installing the software
Download link:
Google Play Store: Just go to the Xiaomi App Store and search for installation
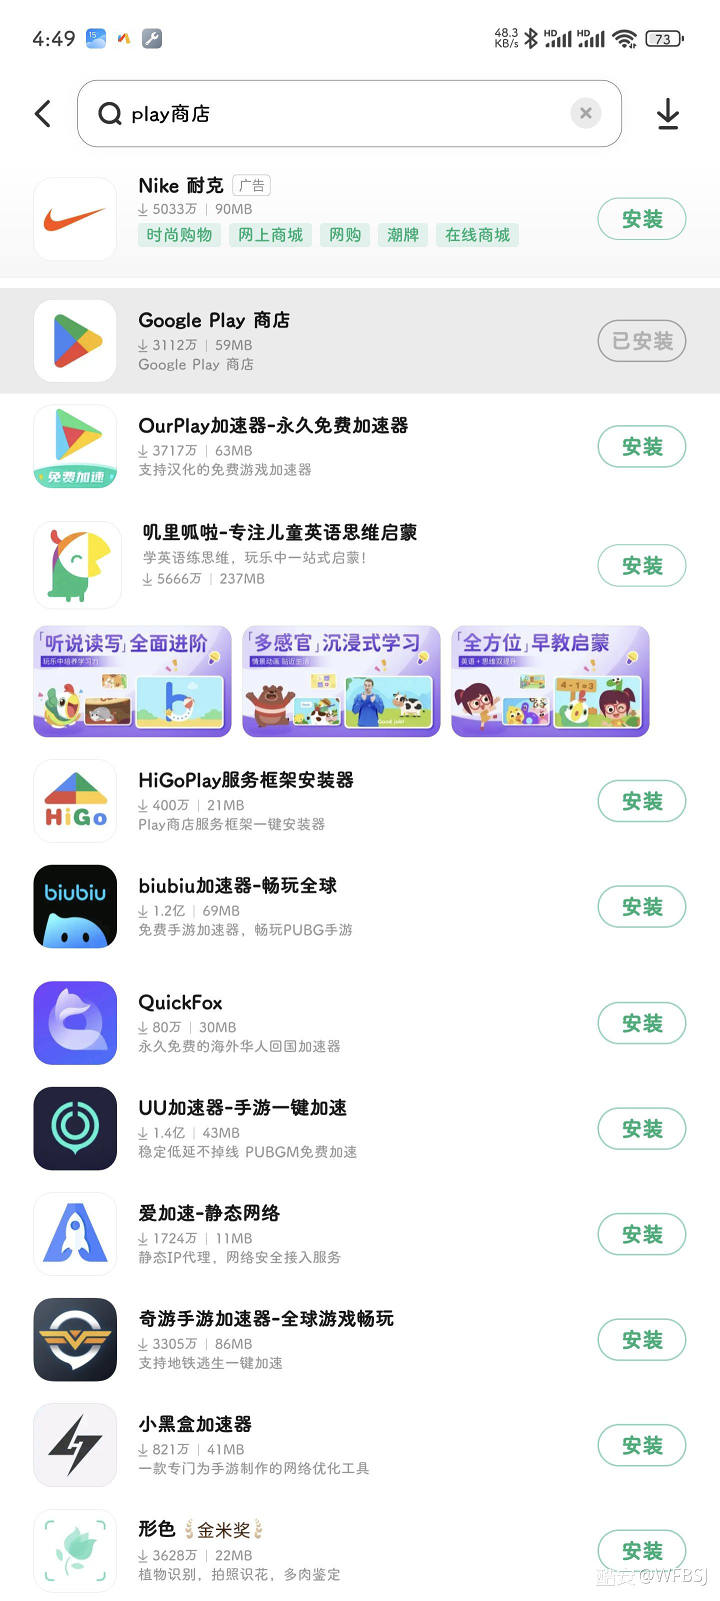
Google Store is here 😋
2. Necessary optimizationsToolsSoftware: Shizuku, Scene,Google services(Generally built-in in systems), Google Store.
3. Any wireless network without network is fine (wireless debugging is required); wireless debugging function requirements Android 11and above Android versions.
————————————— Tutorial start: ——————————————
1. Android wireless debugging started on the Surge system
1. Install the required software (if there are verification blocks, please disconnect from the internet and install)
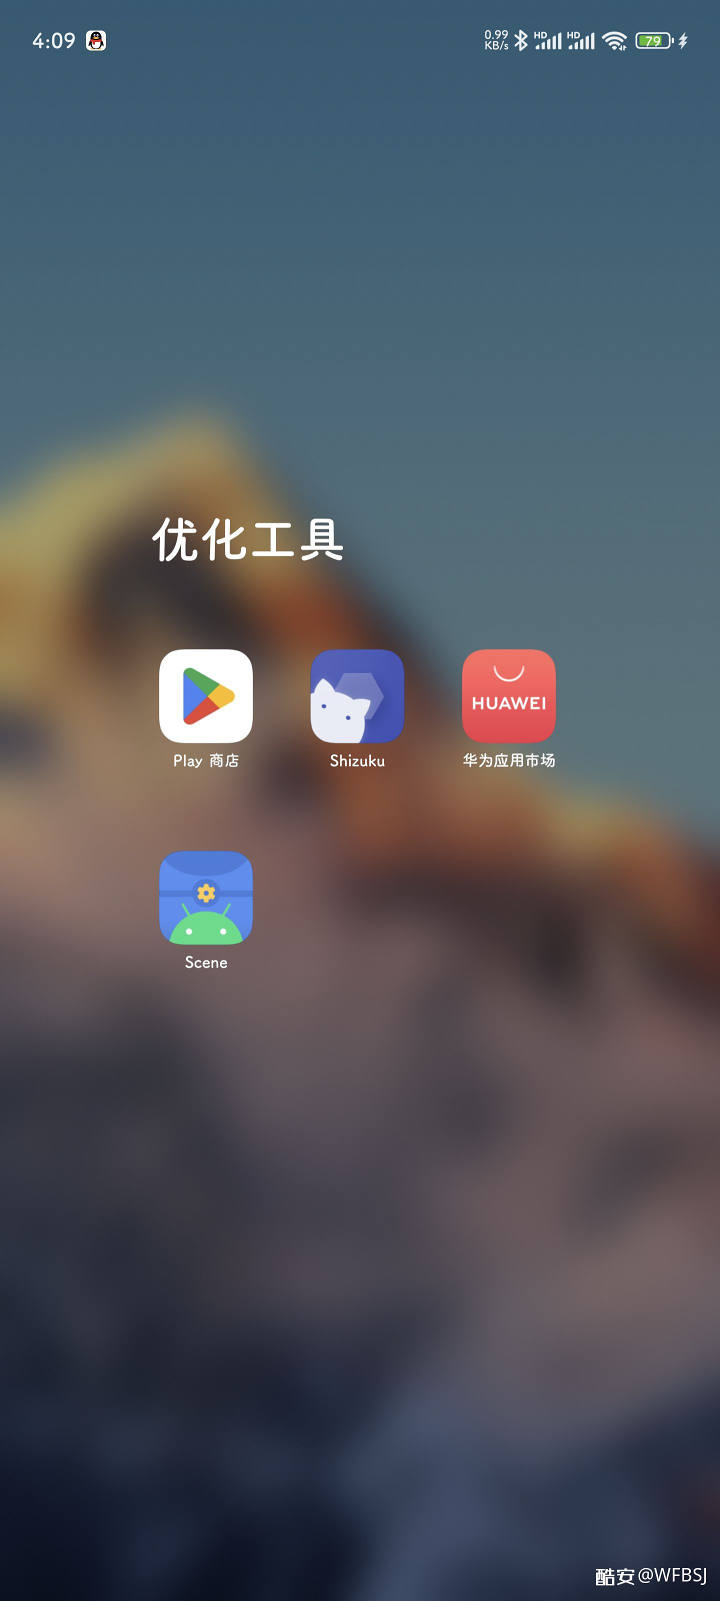
Optimize the required software
2. Modify notification settings (click the gray areas in order)
Steps: Open Settings – click Notifications & Status Bar – click Notification Style Settings – tap Native Styles
(1) In the last image, select Native Style

Click the gray areas in order
Effect after successful setup (each notification has a similar V on the right side)

😜
2. Grant Shizuku Notification permissions
Find Shizuku app – Long press icon – Click the icon with i – Click Notification Management – Tap Allow Notifications (the right side turns blue)
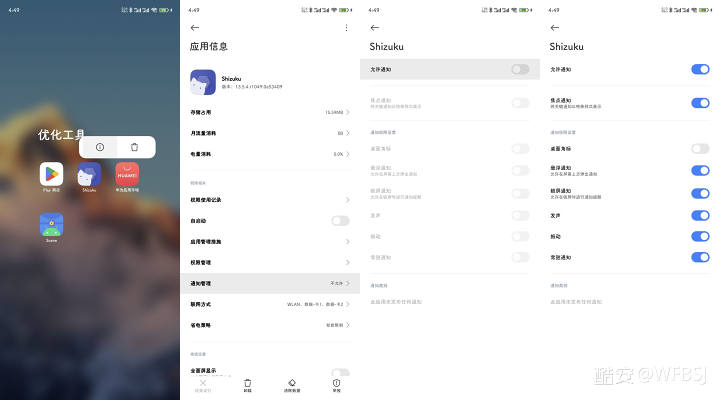
Successfully activated
3. Launch the Android wireless debugging bridge on the Surge system
(1) ActivationDeveloper options
Open Settings – click My Devices – click All Parameters & Information – find OS version – and click more than 7 times in a row until you are prompted that you are currently in Developer Mode
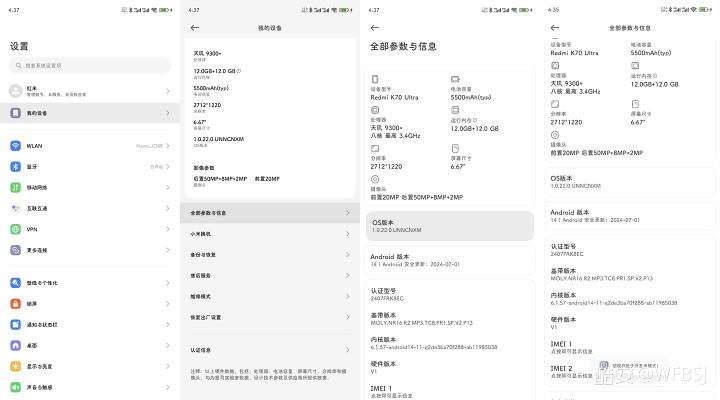
Enable Developer Options
(2) Open USB debugging(Security settings)
Open Settings – Click More Settings – Click Developer Options – Click and enable USB Debugging (Security Settings) – Wait 6 seconds, click the red button, then repeat twice before starting it
The last image below shows successful activation
If More Settings do not have Developer Options, please check 1.3.(1)
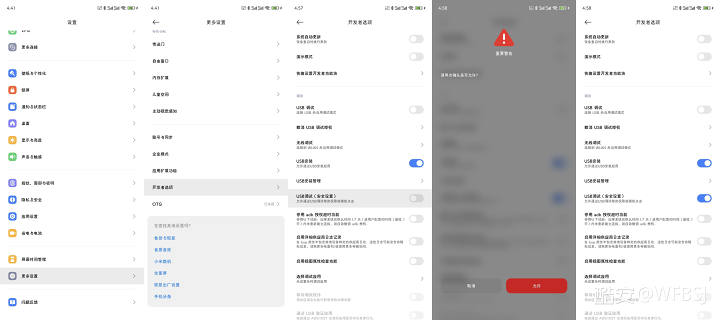
Unlock the success chart
(3) Start wireless debugging
!!! Note: Do not disconnect the wireless connection during this step. If it has already been disconnected, you need to restart this step, which may also cause pairing failure or other failure outcomes!! Until Shizuku successfully licensed the app
Open Shizuku – click Pairing – click Developer Options – find and click Wireless Debugging – click Wireless Debugging – click OK – enable Wireless Debugging again
The last image below shows successful activation
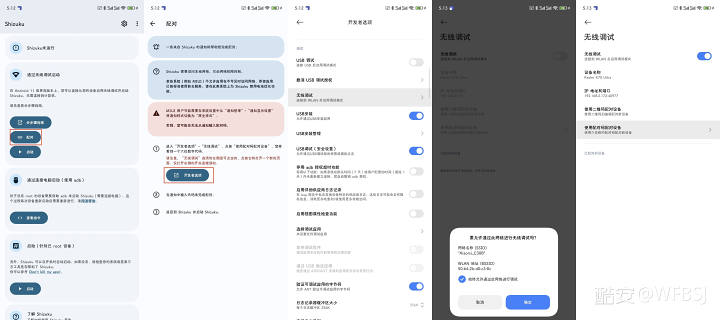
Wireless debugging has started
Then click UsePairing codePairing device – remember the pop-up 6-digit number and hold it still – pull down the left notification bar – click Shizuku on the right V to expand notification – enter the 6-digit number you just remembered and tap the paper airplane on the right – prompt for successful pairing
If pairing fails, it may be due to a different pairing code or the device pairing disappearing
If you can't find a service at all times, please repeat 1. 3.(3)
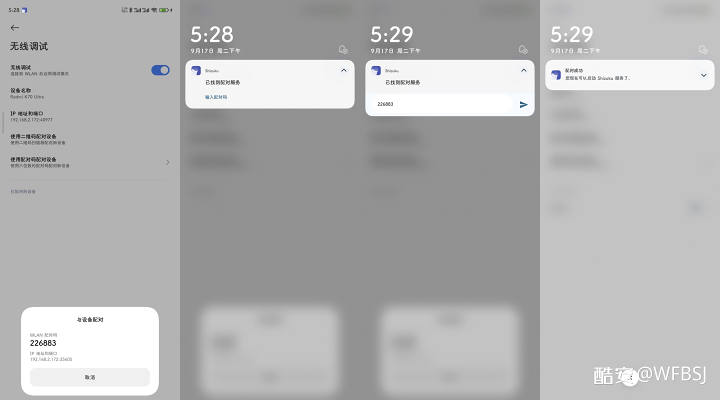
Pairing successful
After that, when adb is needed, please temporarily keep Shizuku running in the background and in the background
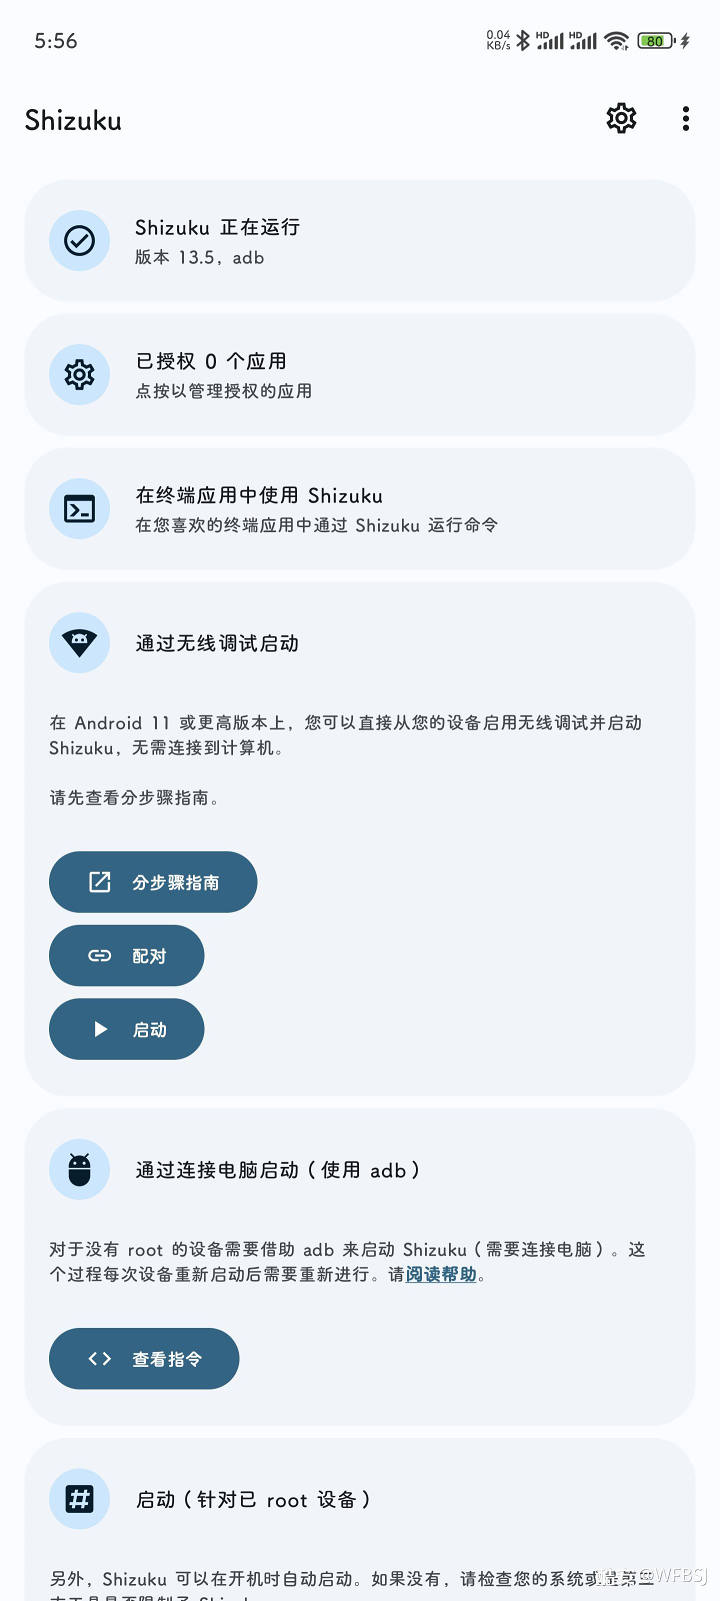
Shizuku finished
2. Systematic rectification
1. De-negative optimization
(1) Streamline unnecessary system software
This tutorial will use ADB mode to uninstall Scene from the current user
!!!! —————————— Disclaimer ——————————!!!!
!! This tutorial will involve uninstalling system software, which carries certain risks. Uninstalling key system software will interfere with system startup, causing the phone to temporarily become bricked. System data cannot be used (after uninstalling and before shutting down and restarting). Please be sure to consider whether the software you uninstalled (or using a streamlined list) is safe?!!
!! As for which ones can't be uninstalled? I suggest referring to multiple streamlined lists. If some of the lists, you can usually uninstall them without affecting startup; if not, you don't know them, so don't take the risk. OK?!!
ADB is not unlockedbldeleting the wrong item has already caused the data to become bricked, so you can only use Recovery Mode to clearly restore all data
If you've already unlocked BL, it seems you can use the module to defend against it, but the details are unclear

For error-based deletion and recovery, please see II. 1.(3)
!! —————————↑↑Data Risk Warning↑↑—————————!!
(1.) First, start Scene and authorize adb
Open Scene – select ADB mode – then click Always Authorize – to enter the interface
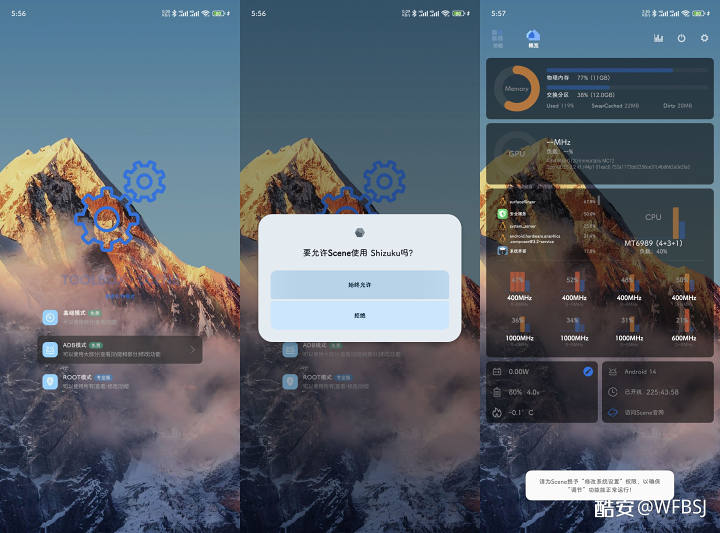
ADB authorization process
Go to the Feature list
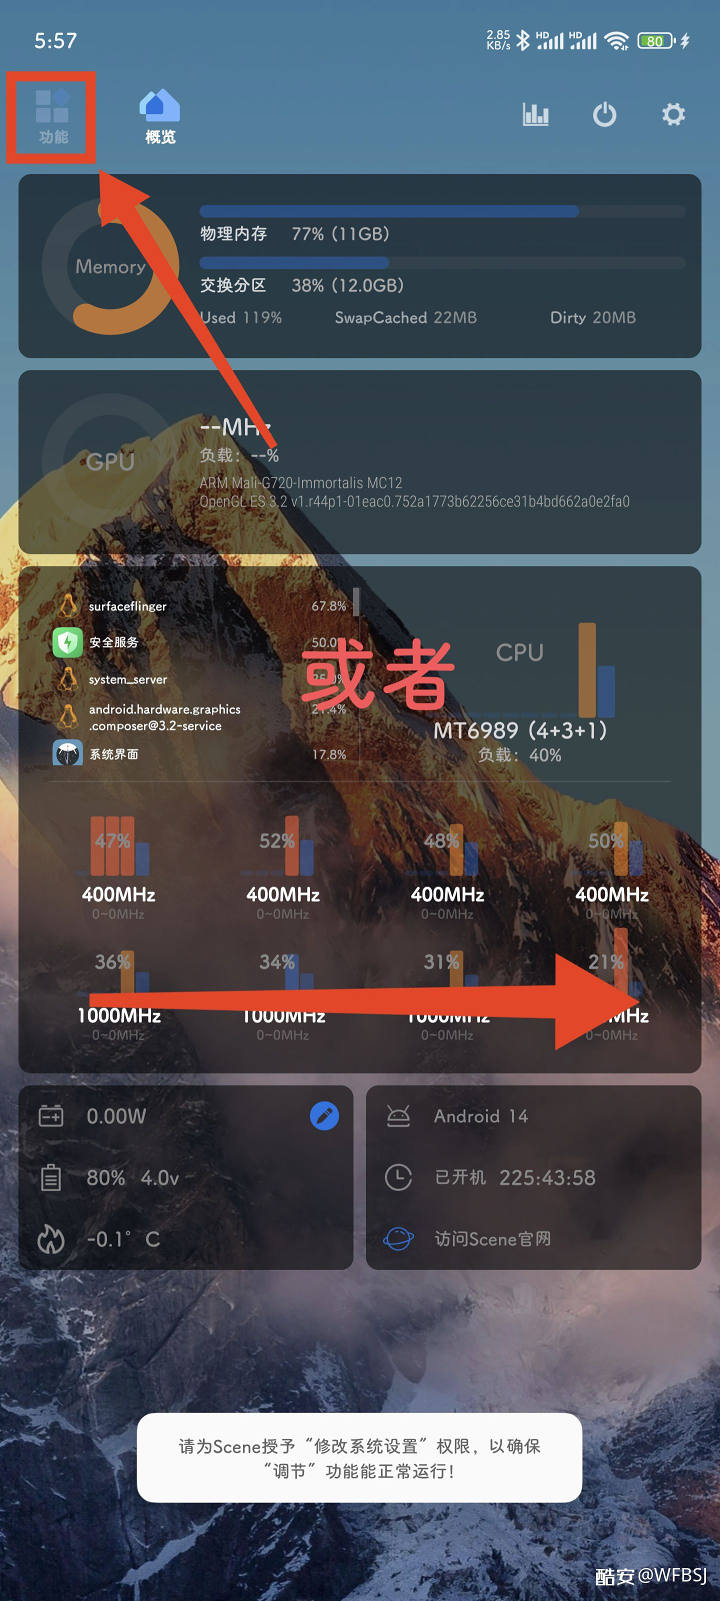
Scene function page
Then click Application management – Click System in the top right corner – then check the software you want to delete or uninstall on the left side of the list – then click the ✓ button at the bottom right – uninstall from the current user – click OK – click OK again – then wait a moment to complete and uninstall (after successful uninstallation, the uninstalled software will not be found in the list; if it is still present, please check again and try uninstalling until it disappears from the list)
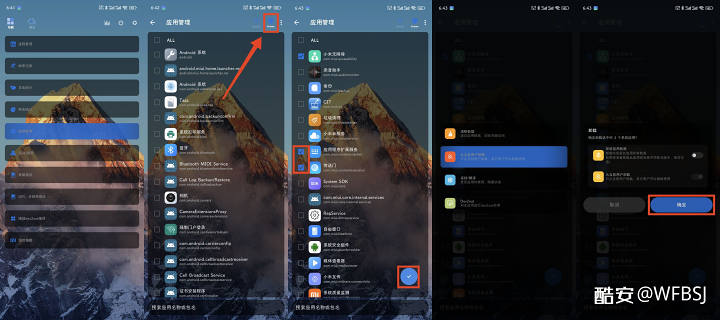
Streamline the main processes
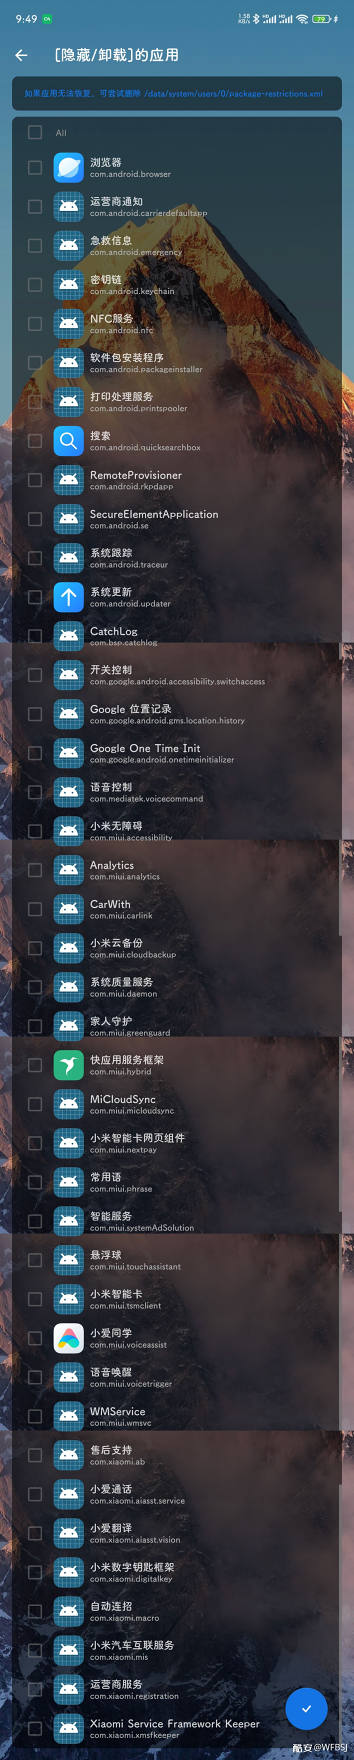
Personal streamlined list
(3) Regarding mistaken deletion
Similarly, in the Scene app management interface – click the three dots at the top – click Retrieve App – then check the box and click the ✓ below to restore the app directly
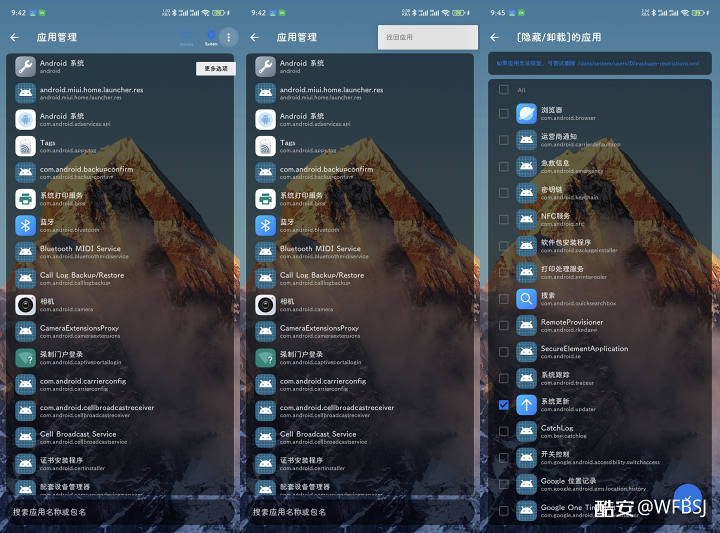
Restored part of the operation diagram
(2) One-click to close some system advertisements
This requires logging into a Xiaomi account
Open Settings – Click About Xiaomi Account – Click System Ads – Click System Ads Tools to turn it off
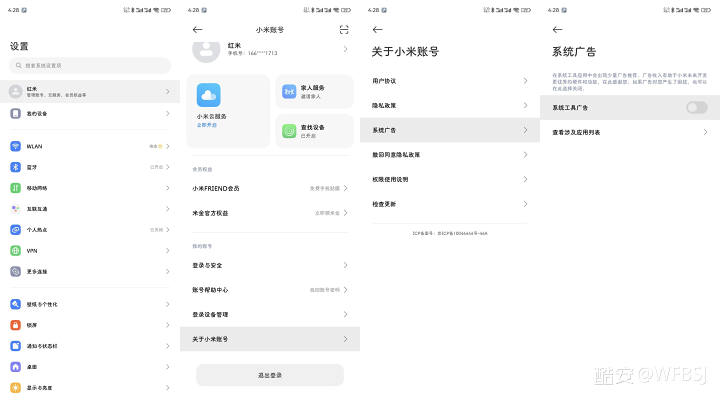
Fuck Ad
2. Perform positive system optimization
(1)UpdateSystem software
Note: Version updates are for better experience and other feature optimizations and even issue fixes, cloud controlDispatchUnrelated
Updatable software: Security Services (formerly Mobile Manager, first half of version number x.x.x), System Service Components, Joyose, System Desktop (depending on availability)
It's not recommended to update. Software with significant differences in extraction from beta and beta versions is unstable, and Android versions are not recommended, but generally they work fine

If you're lazy, you can just update it directly from the built-in app store

It's very stable. If it doesn't work well, it's usually not caused by updating the software. After updating, it's recommended to first use the Paper Five Cleans (i.e., system service components, joyose, HTML viewer, battery and performance, security services, some called Phone Manager). Then just clear them all, it's not a big problem) Data from these five system software, thenRestart immediately

It is recommended to use the app to share and download and install updates Extremely peacefulYou should be able to find the installation package inside
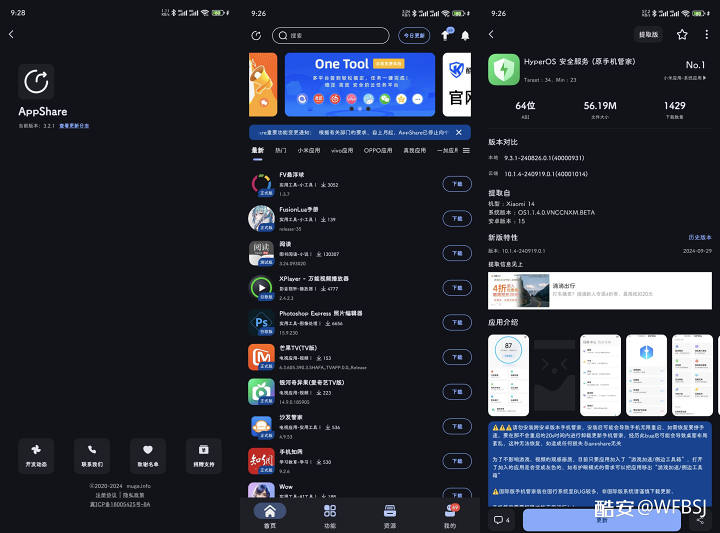
APP Share
3. Third-party software optimization
1. Install software with a good experience
Recommended software installation channel sequence
Google Play Store > customized software> Expert Modified Version> Huawei Store Green Certification Software > comes with its own app store
(1) Use the Google Play Store to install the software
If you don't have a version that can connect with magic, you can follow the download custom version, search under any software topic, switch to the Play version, and download and install
(1) Launch Google Basic Services on the Surging system
If Google Services is closed, update some related Google Services software. The Surging system will automatically open Google Services, such as updating the Google Play Store
When not using Google services, it is recommended to turn them off and reduce themElectricity consumption
Open Settings – Click More Settings – Click Account & Sync – Tap Google Basic Services
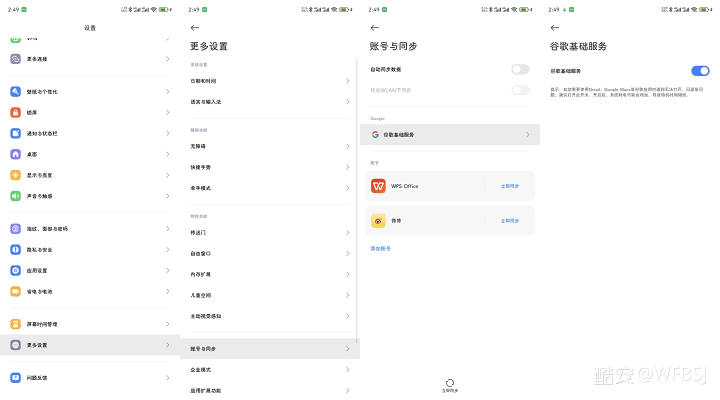
Google Service, Launch 😋!
(2) Install software
Installation is very simple. You can search on the homepage. If it's already installed, you can go to the Management bar of Manage Apps and Devices – then select 'Uninstalled' – and then you can batch check 'Install.'
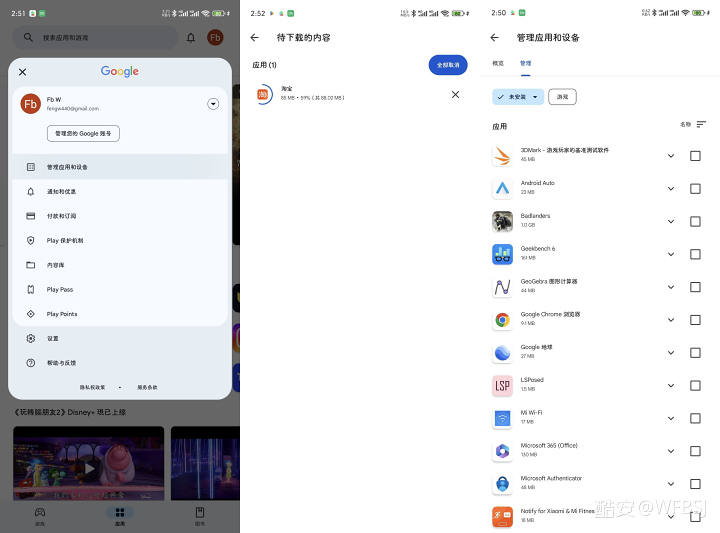
Google Play Store installation software image
If the software in the store is not updated for a long time, installation and use are not recommended, and the experience may be poor
Oh, right! By the way, updating Android System Webview, which is the browser engine that installs the system, affects browser performance and...User experienceMost manufacturers use outdated versions, and some older models are still 32-bit, so you can easily update them through the Google Play StoreLatestThe 64-bit browser kernel is very worry-free and convenient


How to update: Open the update link. You'll be prompted to jump to Google Play Store. Just allow the redirect, then click 'Update' to finish
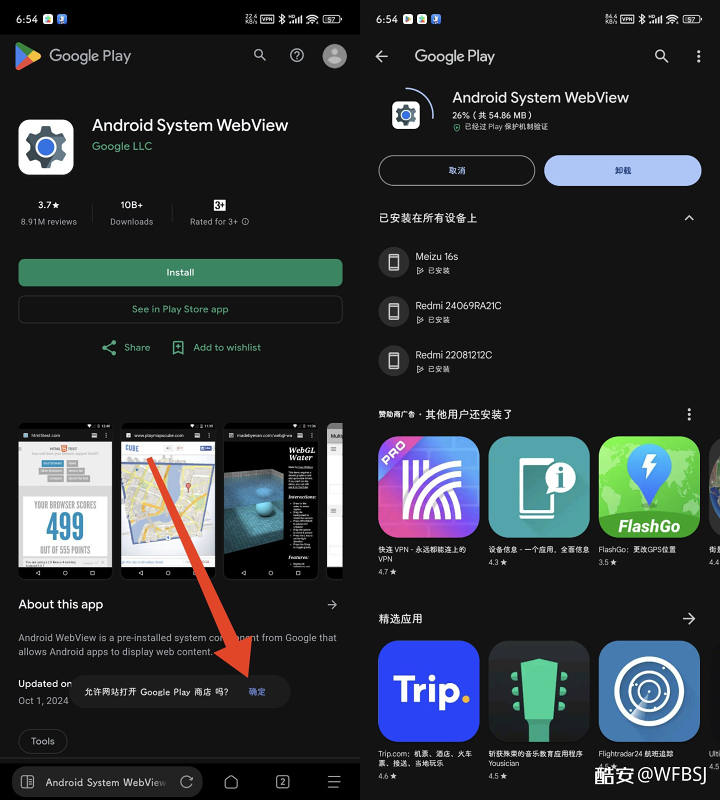
Browser: New Power 😍
Update Link:View the link
(2) Customized version software
It's simple—it's a hassle to find. I recommend searching for custom versions under the relevant software topic and choosing as you see fit

, prioritize customizing apps from the same brand as your phone. Of course, this is a suggestion; you can choose other options

You can also search for keywords and switch to the play version (if needed).
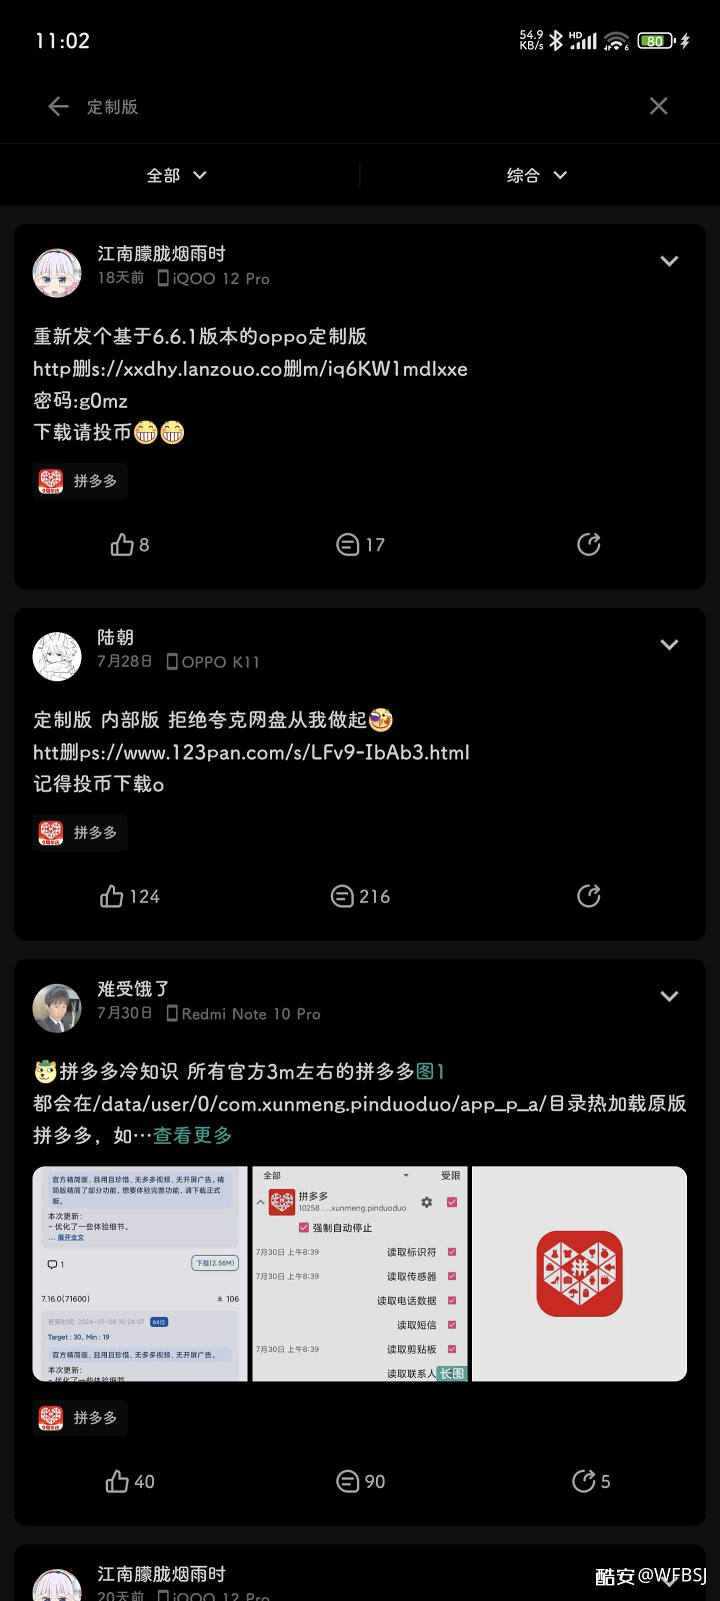
Version search
(3) Modified version by the big boss
This is similar to (2), but it's very troublesome to find (including but not limited to the Coolan platform). Usually, a big shot only modifies one or more apps, and later updates are also made by the modifiers. Actually, the software installed here isn't many, so I only installed two

(4) Install in the Huawei App Store
This is very simple, just recognize the label
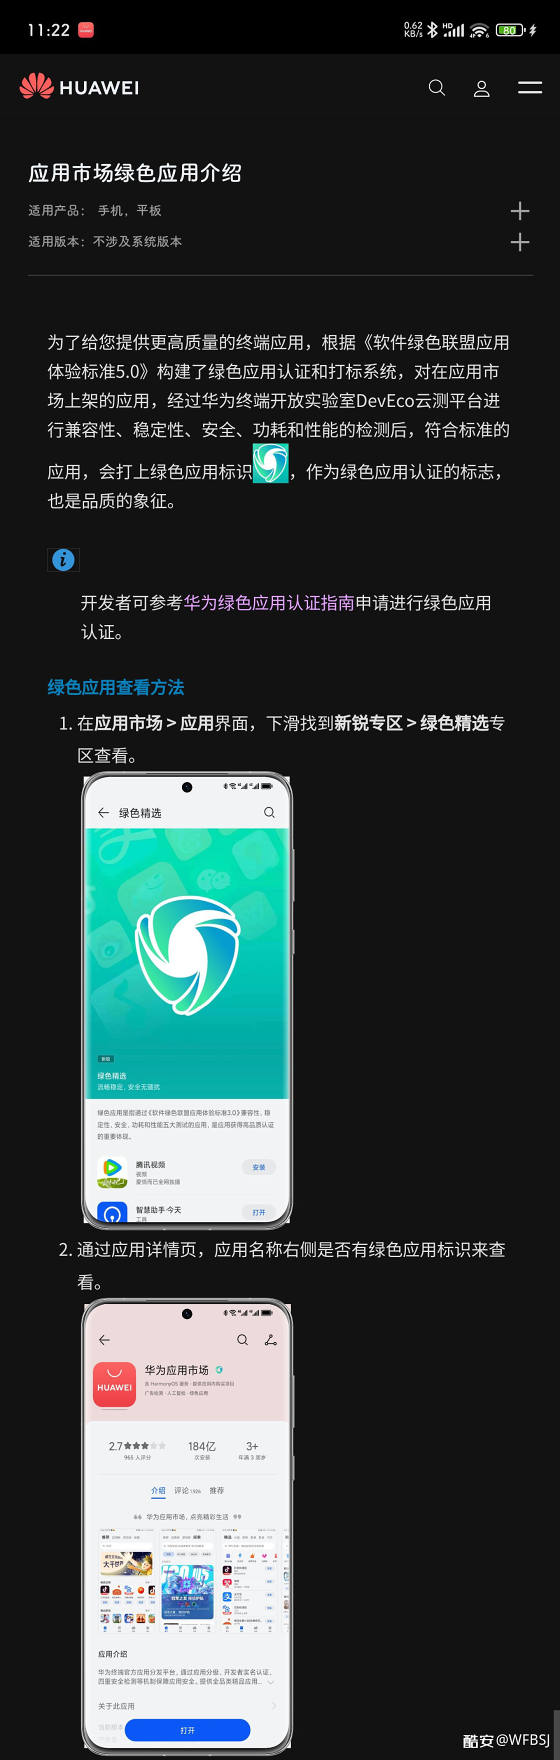
Green application instructions

If the software you install doesn't have a corresponding version, then it's probably some special software or some annoying software. Then there's no other choice—just stick to the official version, as long as it's installed from a trusted source.
!! At this point, you need to install all the software you need, then proceed with the following optimizations!!
2. Optimization between system and software
(1) Dex2OTA optimization
Actually, I don't really understand this either

I guess it means the software is processed in advance, stored in storage space, and then run and saved directly. This allows multiple runs at once, making it easier to use. Compared to the previous optimization, where processing and saving RAM were frequent, the efficiency is much higher

Open Scene in adb mode – click Forced dex2ota – click Everything – and dex2ota will start compiling. You can also pull down the notification bar to check progress (remember to grant Scene notification permissions).
After starting, remember to lock the background or hang a small window in Scene to keep it alive
Since compiling only runs on small cores and is slow for the first time, you can enable Burst Mode or Performance Mode to boost performance and speed up compilation. During this period, heat is high, and once completed, the compilation count equals the app installed on your system (including all built-in software). Normally, it may lag for a while, which is a normal phenomenon. This is likely a sign that the software is being compiled by dex2ota. Some programs may just skip the compilation or be compiled or unable to compile. Don't worry about it—just go with the flow

This compilation requires rerunning each time the system and software are updated,

dex2ota process diagram
(2) Global high refresh rate
My suggestion is to try to adjust the high refresh rate provided by the system. Using adb or root to force high refresh rates will disable LTPS variable refresh rates, i.e., frame rates lock at 90, 120, and 144. This causes static (not dynamic pages) to still run at high frame rates, resulting inPower consumptionwhich is relatively high and thus has an impactBattery lifeAlso, changing the theme to include dynamic content can cause this (some parts can actually be hidden). If battery life is a concern, it's best to consider carefully.
So, how do you see it specifically?
You can use any frame rate detection in Scene as a reference. Under normal conditions, when LTPS is left static without animation, FPS is about 1 to 0 frames. If the frame rate remains within the high refresh frame rate range, LTPS is invalid
Mine didn't use high refresh rate software?
If not, then don't use it

Enabling performance mode might help; if you use root, it can show up. As for whether it works, I'm not sure. If not, you can only use adb or root methods to force a high refresh rate.
Personal setup steps: Open Settings – tap Display & Brightness – tap Screen Refresh Rate – tap Customize and select the maximum 144Hz – tap Use High Refresh Rate apps – turn everything on
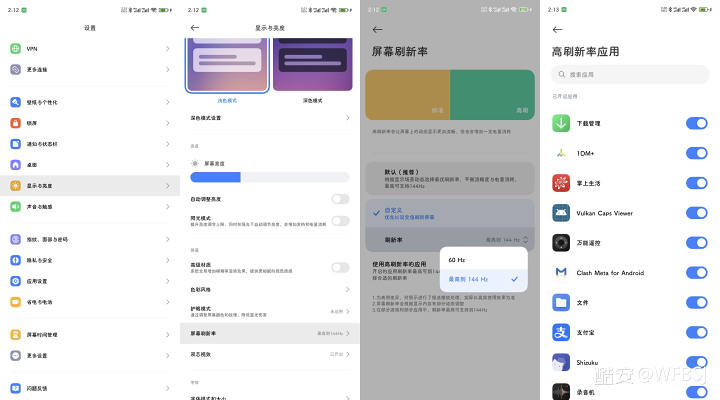
Global high refresh rate settings
(3) Disable all apps that start automatically
Turn off all apps to start automatically. This can reduce unnecessary resource usage and save power when you're not using the software. This is not recommended; it's best to turn it off first and try it. If it really affects your use of the software, it's best to turn it back on

Open Settings – click App Settings – click Auto-Start Management – click the top right corner and also tap Show System Software. Then, depending on how you use it, close as much as possible

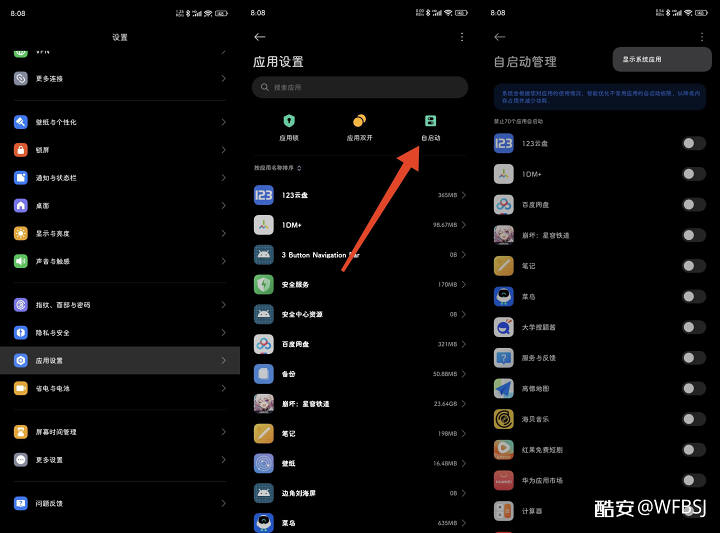
The gate opens by itself
(4) Apply intelligent power saving
This step sets the app power-saving strategy, which is built into the systemBattery optimizationConfiguration, and configured according to personal usage needs, best suited to your needs
Open the Scene feature page – click Events/Services – search for Battery and Performance – click Apps Smart Power Saving – click Start – click More below. Click Show System Software to configure each appBatteryOptimized strategy

Setting suggestion: Unlimited restrictions for necessary apps that need to stay in the background; Smart Limit allows you to occasionally need background apps and avoid difficult apps; just disable background apps that don't require them
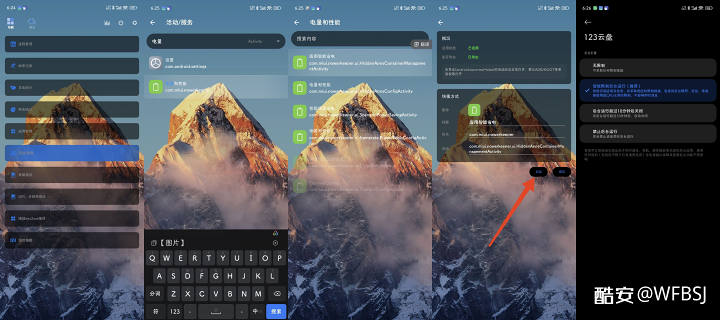
Power-saving configuration
——————————————— Conclusion —————————————
OK, that's all for this tutorial. Mainly, I can't think of anything else that could be optimized for now. Cool friends are welcome to come and discuss. If there are new optimizations or content improvements, I can consider making further revisions

。
As for adding content, due to CoolEase's limited number of compilations, you might need to delete and rewrite the original content. Of course, I don't update it very frequently, so collectors don't need to worry too much

Writing content is not easy, so I hope all cool friends will support me

Actually, I just want Huohuo to let more people know about it, so more people can use a better Android device


Original link:https://www.coolapk.com/…
![[Open Source Reading] January 2024 ≈ 400 carefully edited book source compilation and update - Baiyun Blog](https://www.bybk.cc/wp-content/uploads/img/af867764c3780f0b7da88376fca7bf92.png)
![[Open Source Reading] November 950+ carefully proofread book source compilation and update - Baiyun Blog](https://www.bybk.cc/wp-content/uploads/2023/02/Screenshot_20230222-1001582.png)
![[Open Source Reading] October 1300 Book Source Update - Baiyun Blog](https://www.bybk.cc/wp-content/uploads/img/1eeb6ae31cde88ab39faa2f19651638d.jpeg)
![[VMOS PRO 2.9.6 Member Edition] - Baiyun Blog](https://www.bybk.cc/wp-content/uploads/img/c303a7a50d3ebfa235cc380190db2980.png)
![[Open Source Reading] November 950+ carefully proofread book source compilation and update - Baiyun Blog](https://www.bybk.cc/wp-content/uploads/2023/02/Screenshot_20230222-1001582-1024x593.png)




No comments yet