
First of all, thank you@bruce_tengThe big shot's porting has made the 8T, an old model, available for useLatestColorOS15.
I found that many engine oils still have doubts about brushing ColorOS 15, so I'm making a feeding episodeTutorial, I hope this is helpful to everyone.
Currently, there are two ways to flash ColorOS 15 from the official version, and you can choose freely. But regardless of the flashing method,Mobile phonesAll require unlocking the Bootloader ⚠️ BL Phone data will be wiped, please make sure to back it up.)
1. Bootloader unlocking method
1. Settings - About Device - Version Info, tap the version number repeatedly to open Developer Mode. Settings - System andUpdate Page entryDeveloper options, enable OEM unlocking and USB debugging options.
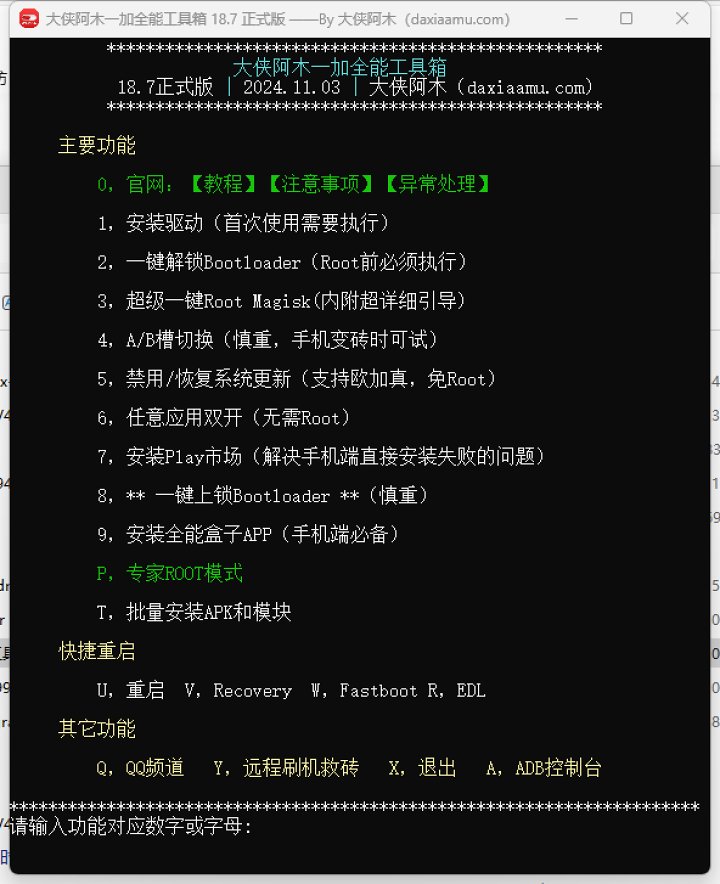
2. Search for 'Hero Amu' on Baidu,Downloadand running OnePlus alongsideAn all-in-one toolbox, mobile phone connectionComputer, select Transfer File from the pop-up box (if there is no pop-up, replace the data cable), and use OnePlus All-PowerfulToolsEnter the number 2 on the box screen and follow the prompts to unlock the bootloader.
1. root Then swipe in
(1) Root the phone
After unlocking the Bootloader, due to the system reset, you still need to enable Developer Mode and enable USB debugging as described above.
After connecting to the computer, still use the OnePlus All-in-One Toolbox to root the device. In the OnePlus All-in-One Toolbox interface, press the number 3 to perform one-click rooting, follow the software prompts, and restart your phone to run the mobile version Magisk Follow the prompts to restore the environment.
(2) Download the flashing package from the expert and GT Console Assistant, open the console assistant, and in the pop-up box, grant root and file management permissions.
PointInstallationFrom the menu, enter the flashing interface, open the custom OTA package and phone format options (formatting is strongly recommended, otherwise upgrading it will cause various unpredictable issues).ROM Click OK for the file path selection of the expert flashing package, wait for flashing to complete, then restart and embrace the new ColorOS 15 system.
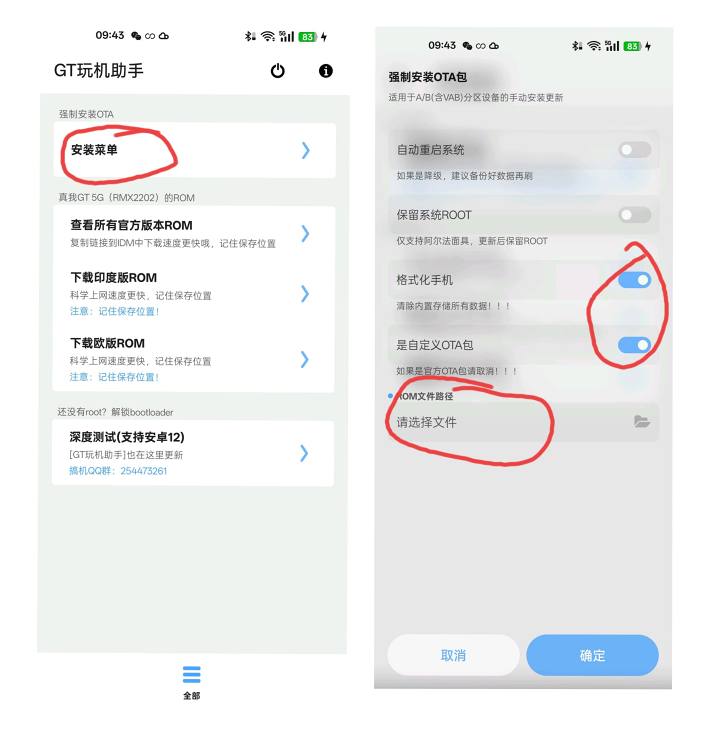
You can also enable the auto-restart option on the flashing interface above, completing this process automatically.
2. Flash in sideload mode
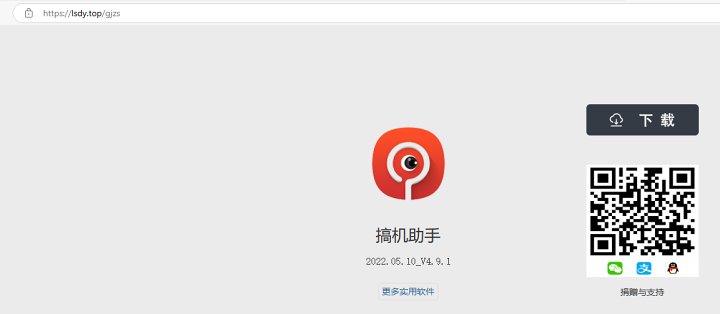
Besides flashing after rooting mentioned above, you can also choose sideload mode for flashing. FirstGadget assistantDownload the Gadget Assistant from the official website.
(1) Turn off your phone and simultaneously press the power button + volume down button to enter fastboot mode.
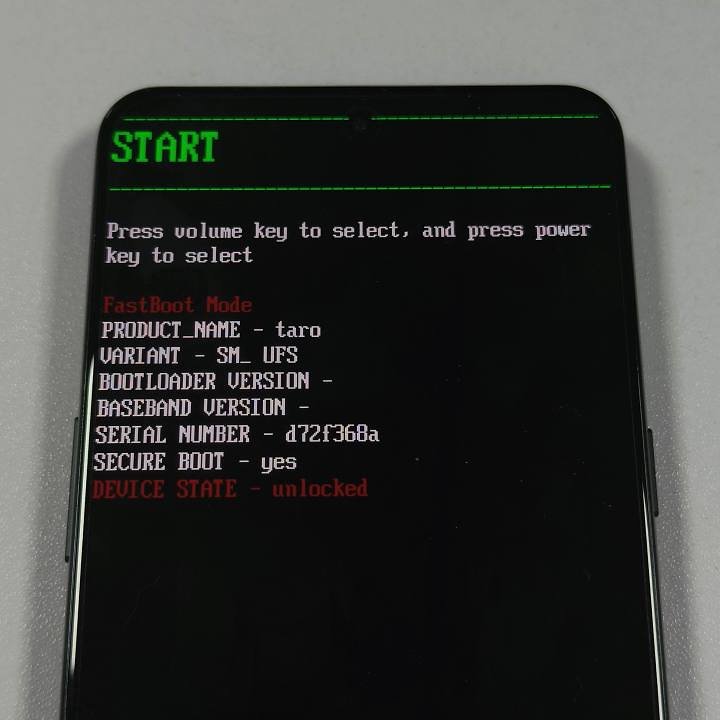
(2) Download@bruce_tengOrangeFox-R12.1-Unofficial-opkona.img file in the 'Big Boss' folder. Run the PC Assistant on your computer, then select 'Flash REC' in the boot mode tab.
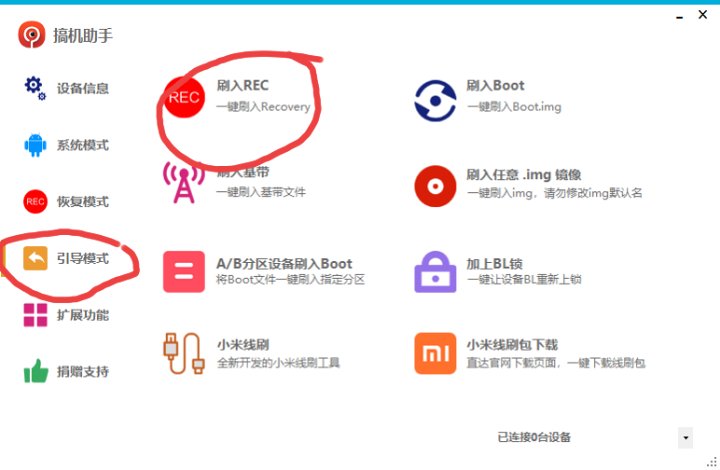
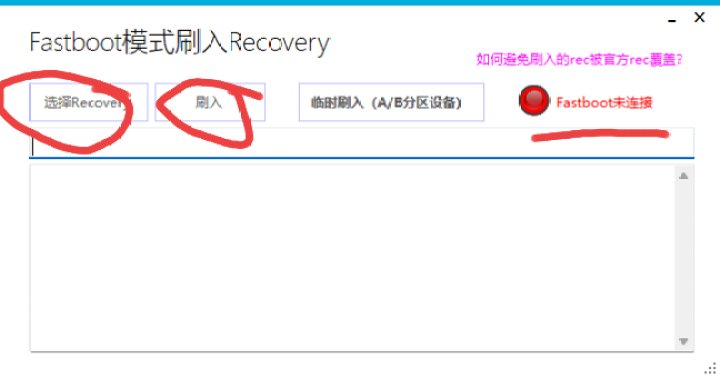
(3) In the pop-up Fastboot recovery interface, if your phone is correctly entering Fastboot mode, the right side of the interface should show 'Fastboot is connected.' Select the downloaded OrangeFox-R12.1-Unofficial-opkona.img and flash it.
(4) After flashing OrangeFox Recovery, restart and follow the steps above to enter Fastboot mode. Press the volume button in the fastboot interface until the word 'recovery' appears at the top (not exactly remember), then press the boot key to confirm and enter recovery mode.
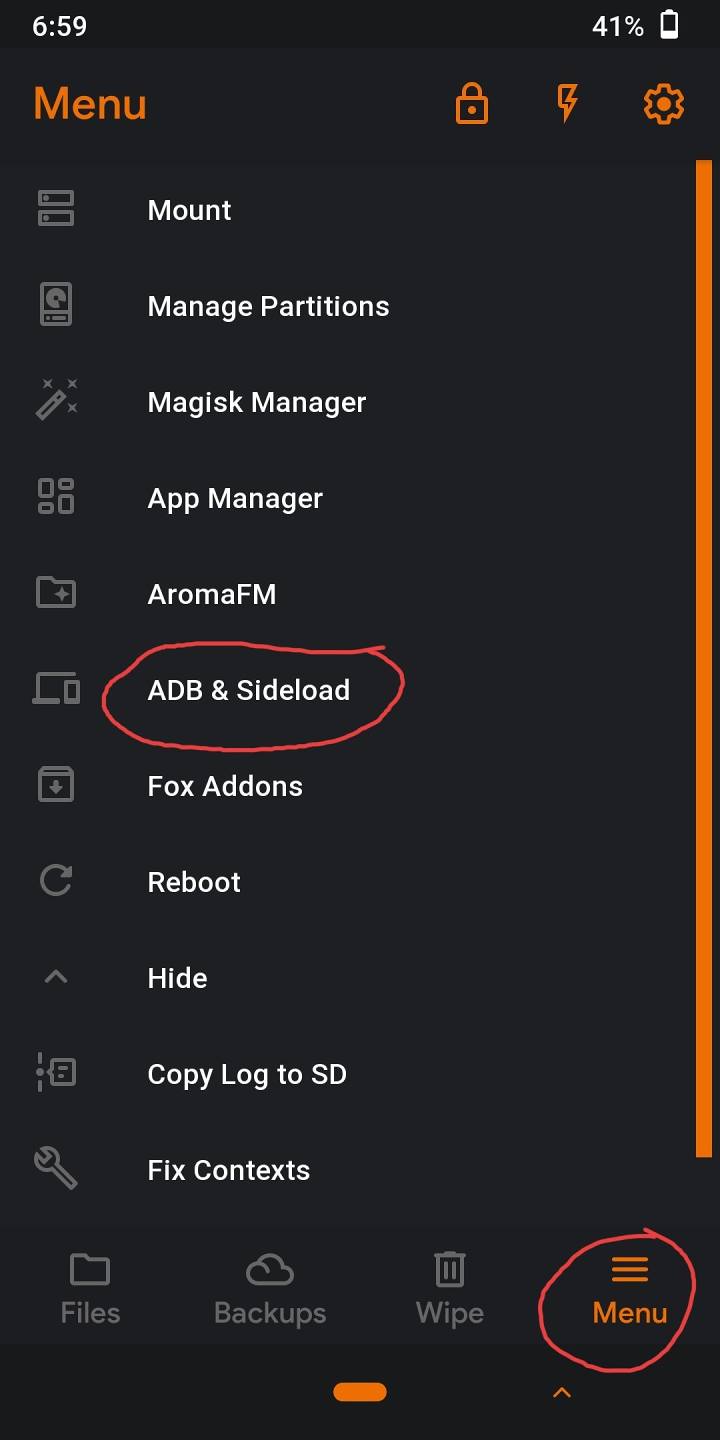
(5) In recovery mode, press the menu shown below to enter sideload mode, then connect your phone to the computer and prepare for flashing.
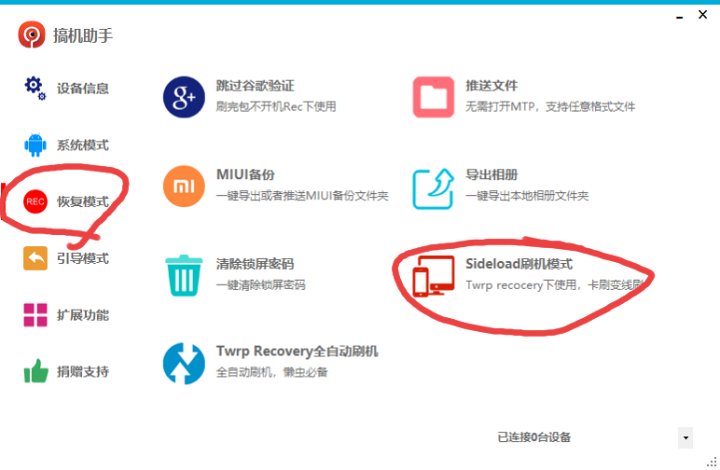
On the computer, still open the Gadget Assistant. In the Recovery tab, select sideload flashing mode, enter the interface, choose the expert's flashing package, wait for the flash to finish, then manually restart the device.


The new package for the expert on December 10th requires flashing the kernel using KUS, and I used this method to flash it, except when choosing the flashing package, I chose the kernel package provided by the expert.
⚠️ If you don't get used to upgrading to 15, you can also use the sideload method to return to 14, just go to Hero AmuCloud diskJust download the 14 version 600 or 602 card flash package and flash it; you don't need to start with the 9008 from Daxun.
3. Follow-upOptimizationWork
1. root
(1) ksu root solution
If you're using a top-tier old package, just install the KSU manager on startup. Note that version 1.01 is installed; version 1.02 is not available. If you're flashing a new 10-day package from a pro, you need to flash the kernel after booting to gain root access. The method for flashing the kernel is explained in the previous section

Tip.
(2) Magisk root solution
If you're not used to KSU, you can switch to Magisk. If you do, I personally recommend switching to the Alpha version of Magisk, which works fine.
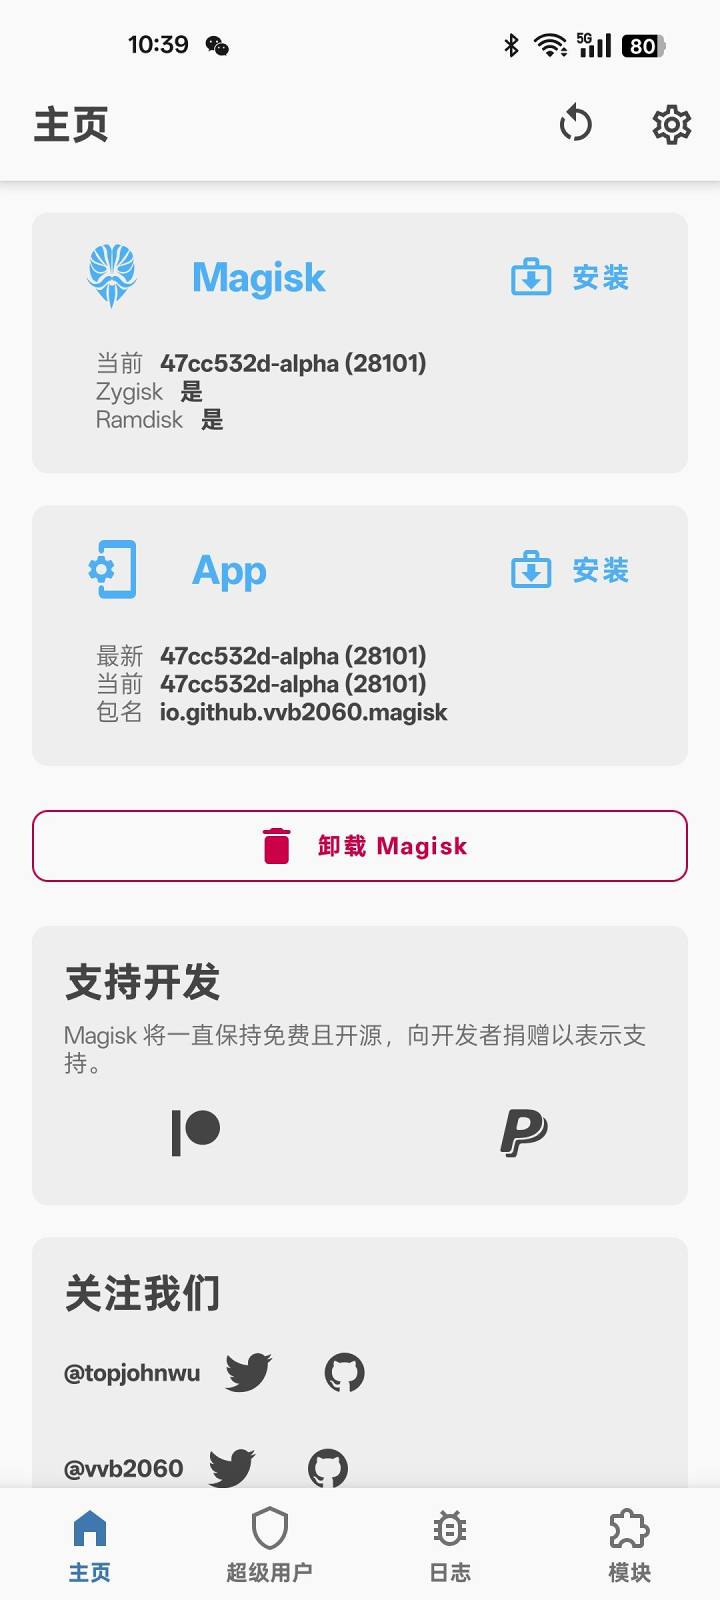
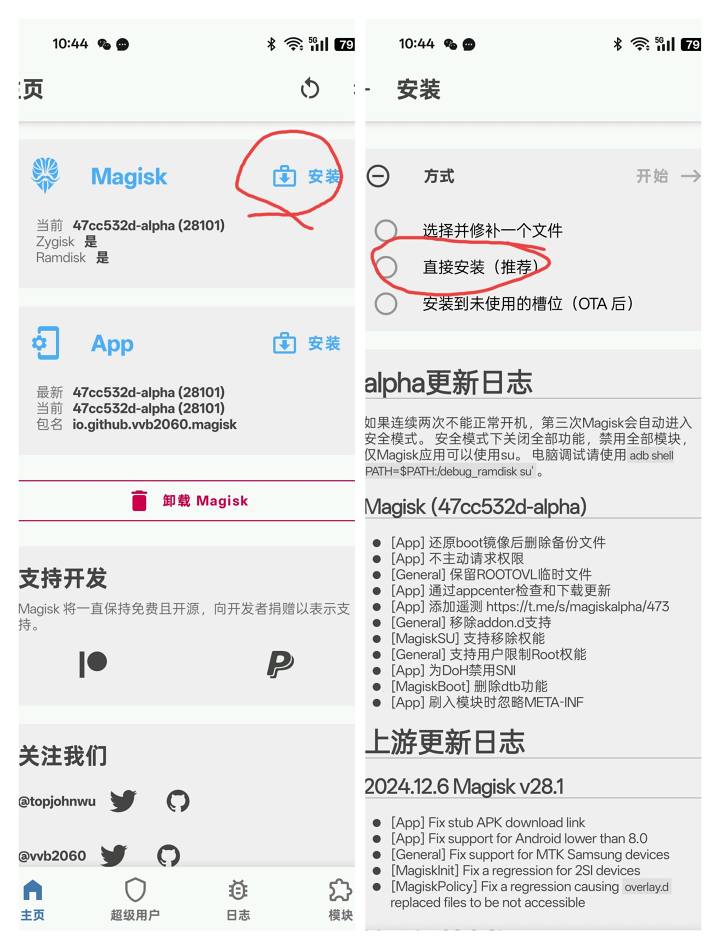
Since the OnePlus All-in-One Toolbox currently does not support the root solution for OnePlus 8t ColorOS 15, the latest flashing package requires switching from KSU to Magisk.
The method is to install Magisk, then after giving the software superuser privileges to KSU, open Magisk and click Install at the top of the main interface. In the pop-up interface, click Install and wait for it to finish. Restart to go to Magisk and uninstall KSU.
2. Module recommendations
There are a few personal modules. The first is one-click root detection. Once installed, 12306's facial recognition and Cloud QuickPass fingerprint recognition are ready. Please contact the experts@R1263599071Download and download at the locationRead onUser tutorial. Additionally, this module allows deep modification of device models and brings up some exclusive features for new models.
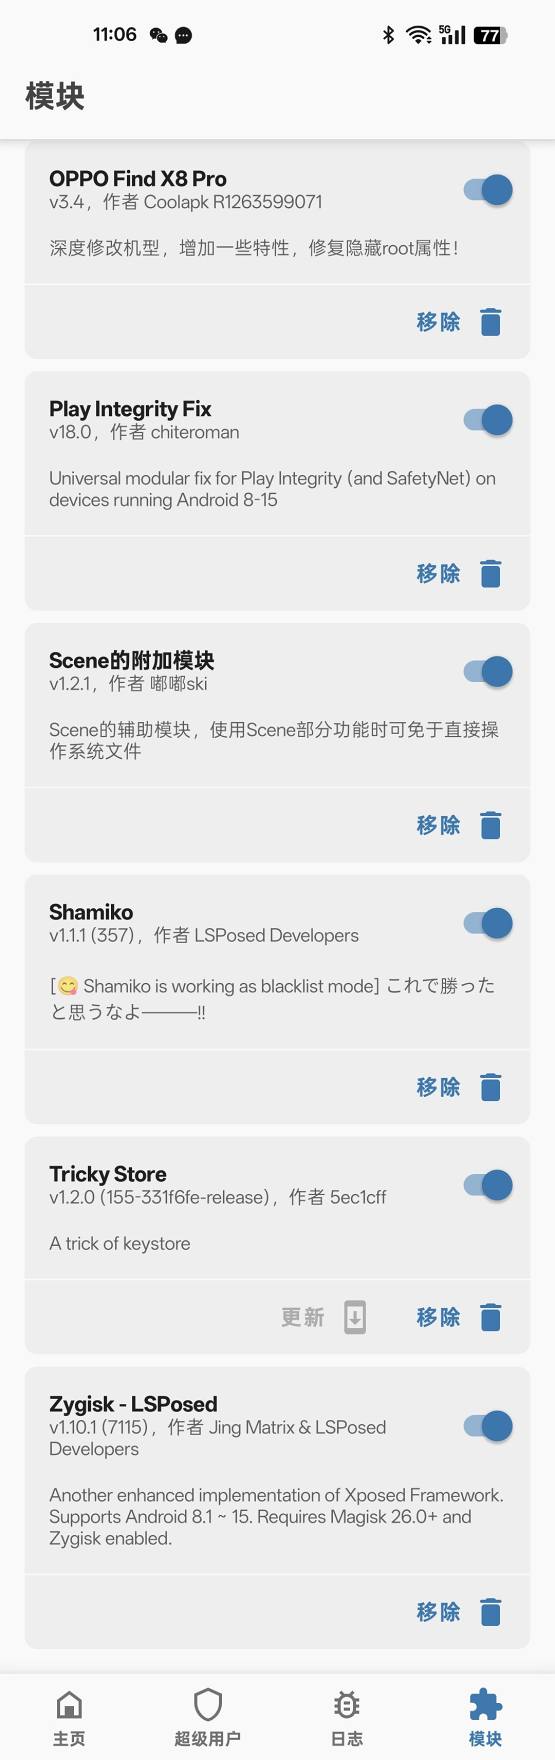
The other modules are common models and will not be introduced in detail.
3. Fixing some issues in ColorOS 15
With these updates, the COS15 port has fewer and fewer issues, but some features still need to be adjusted.
1. AI Image assistant
The AI image assistant feature in photo albums can be implemented by modifying the device model and mounting feature code via Magisk.
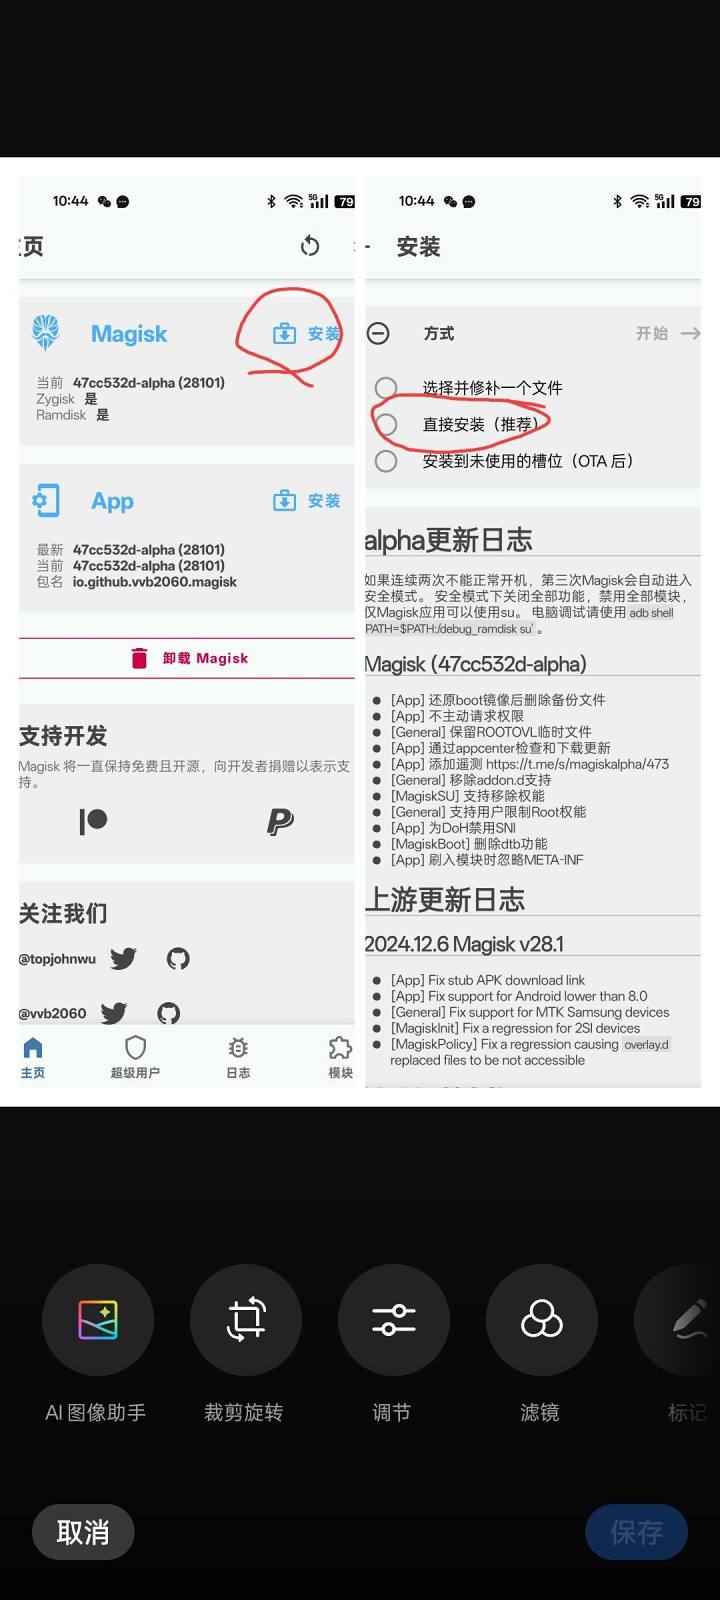
However, it has been found that only albums prior to version 15.9.5 can be installed, so you need to change the album version number from version 19.9.5 to one larger than the system's default version 15.16.4 before installation. Use the manager to modify the version number field in the Android Manifest package file and install it to resolve the issue.
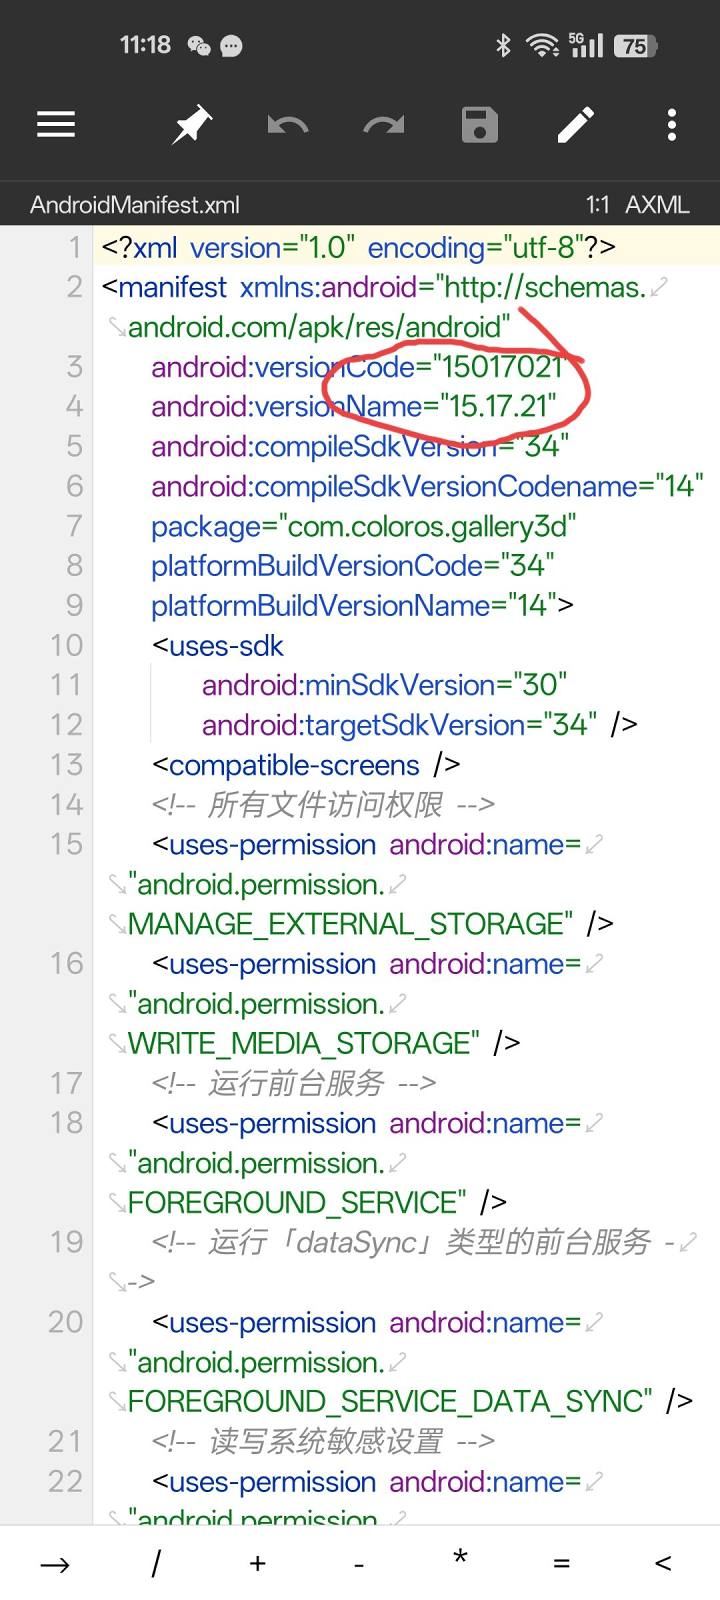
However, after installation, there was a problem where albums crashed when entering the private safe. It seems the private safe detected a new version of the album and called a new interface. My personal skills are limited and I can't resolve it. Since I never use the private safe, I froze it in the scene and completely hid the private safe to fix the crash.
Here, I once again ask the experts@bruce_tengWhen packing, I was able to downgrade the album to version 19.9.5 or earlier, thank you

。
Modified models for use@R1263599071The expert module completes the AI features@天伞桜The code provided by Aunt San<app_feature name="os.graphic.gallery.os15_secrecy" args="boolean:true"/> Fill in the model modification module /my_product/etc/extension/com.oplus.app-features.xml file.
2. lsposed module recommendation
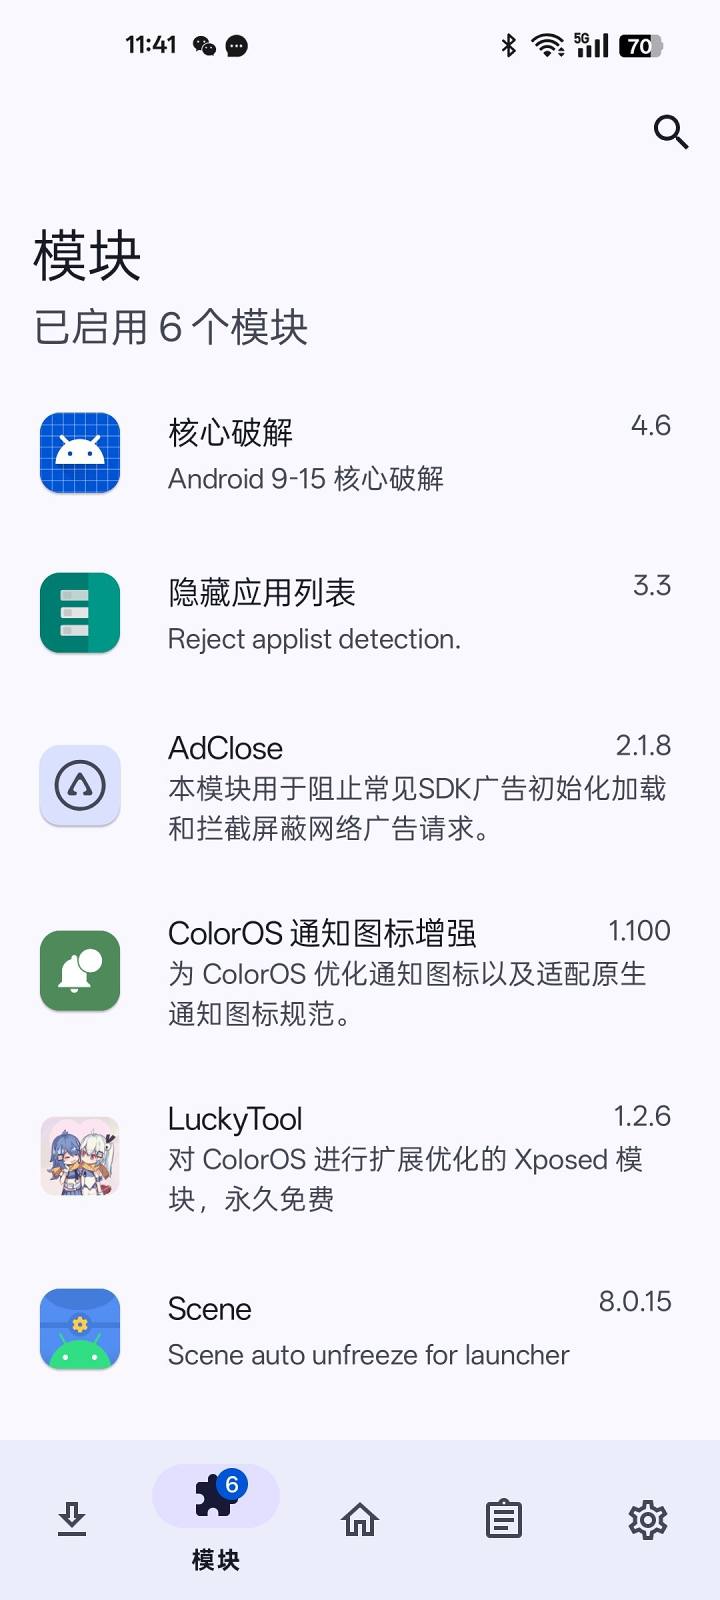
Part Two covers the installation systemApplicationYesCore crackSince lockytool currently does not support the kernel crack for Android 15, you need to install kernel crack software version 4.6 or above. Please search for software within the site.
Here are a few other lposed modules I'm currently using, recommended for everyone:
3. Animation and blur filling
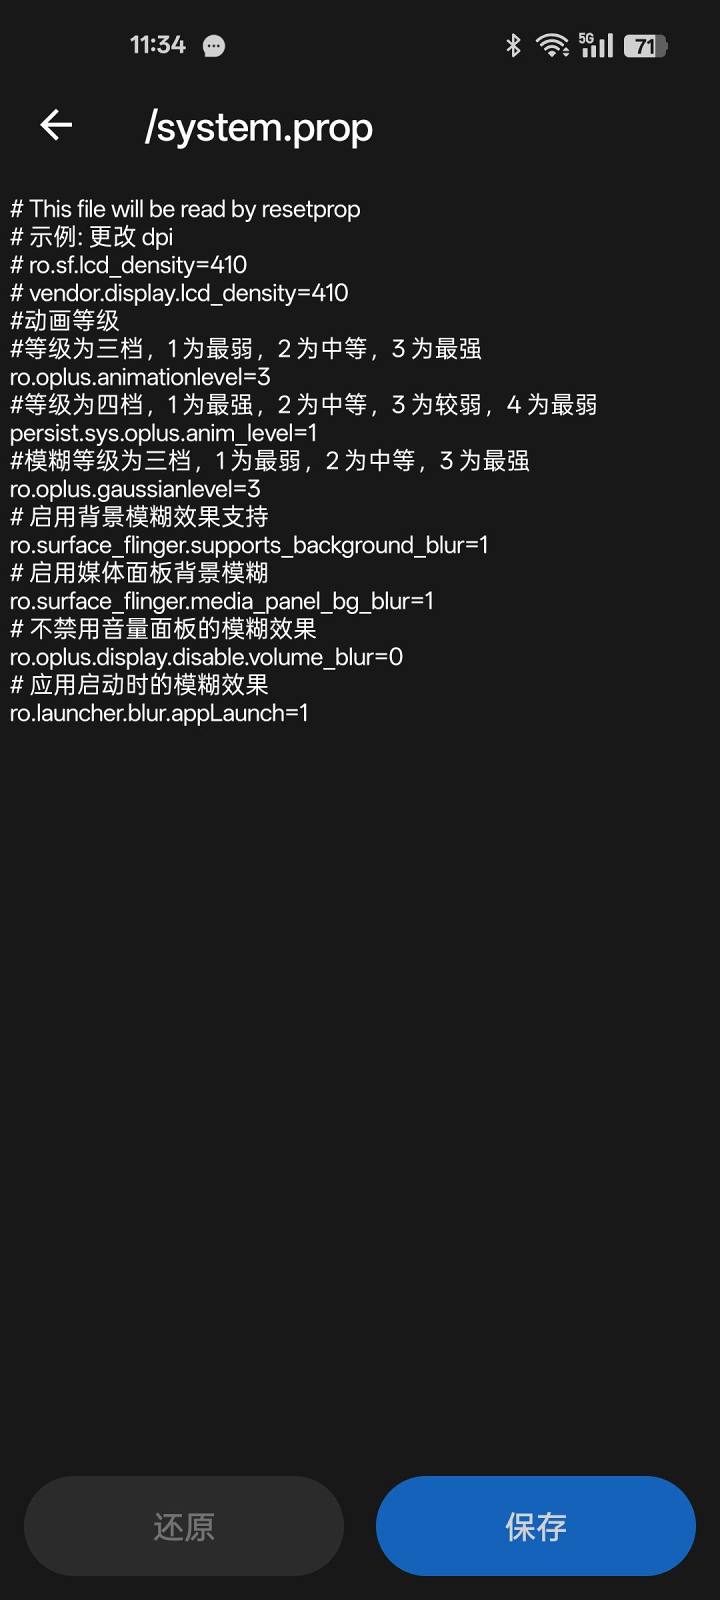
Since the expert removed some blur effects to ensure smoothness, those interested can add the following code to restore them in scene - Features - Add-ons - system.
ro.oplus.animationlevel=3
persist.sys.oplus.anim_level=1
ro.oplus.gaussianlevel=3
ro.surface_flinger.supports_background_blur=1
ro.surface_flinger.media_panel_bg_blur=1
ro.oplus.display.disable.volume_blur=0
ro.launcher.blur.appLaunch=1
Finally, thanks to all the big shots for their dedication


Original link:https://www.coolapk.com/…
![[Open Source Reading] January 2024 ≈ 400 carefully edited book source compilation and update - Baiyun Blog](https://www.bybk.cc/wp-content/uploads/img/af867764c3780f0b7da88376fca7bf92.png)
![[Open Source Reading] November 950+ carefully proofread book source compilation and update - Baiyun Blog](https://www.bybk.cc/wp-content/uploads/2023/02/Screenshot_20230222-1001582.png)
![[Open Source Reading] October 1300 Book Source Update - Baiyun Blog](https://www.bybk.cc/wp-content/uploads/img/1eeb6ae31cde88ab39faa2f19651638d.jpeg)
![[VMOS PRO 2.9.6 Member Edition] - Baiyun Blog](https://www.bybk.cc/wp-content/uploads/img/c303a7a50d3ebfa235cc380190db2980.png)
![[Open Source Reading] November 950+ carefully proofread book source compilation and update - Baiyun Blog](https://www.bybk.cc/wp-content/uploads/2023/02/Screenshot_20230222-1001582-1024x593.png)




No comments yet